Frequently Asked Questions
Bookji provides School Administrators, Educators, and Students with a recommended checklist of actions they should perform when first using bookji.
To access the checklist, click the circle with a plus icon in the lower-left corner of the page.
Upon clicking the Getting Started Checklist menu item, a modal will open. The contents of this dynamic list will be tailored to your user type: School Administrator, Educator, or Student.
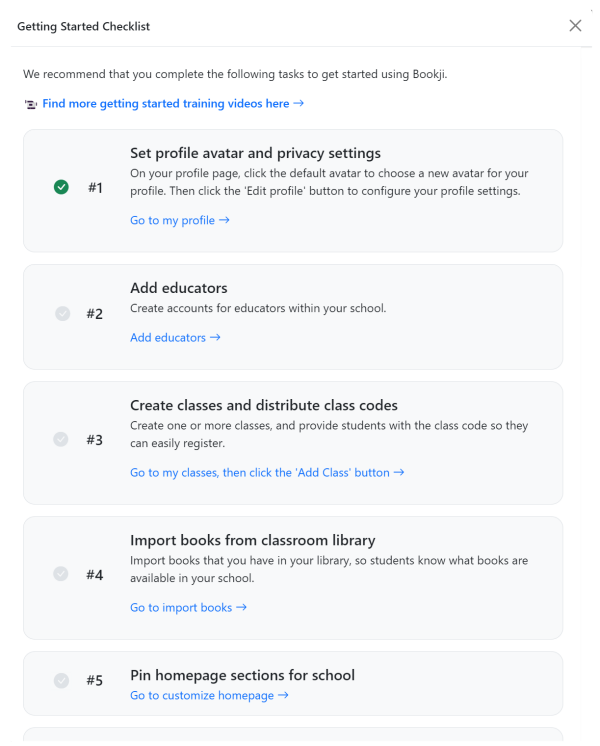
As you complete each item in the list, the grey checkmark icon will turn green, indicating that you completed that task.
Not all tasks must be completed, but this is an excellent place to start.
Yes. Bookji provides a report showing what steps your students have completed in their getting started checklist.
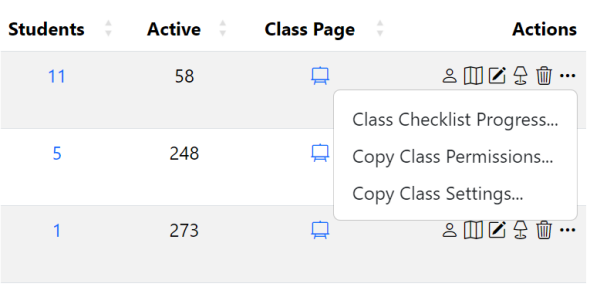
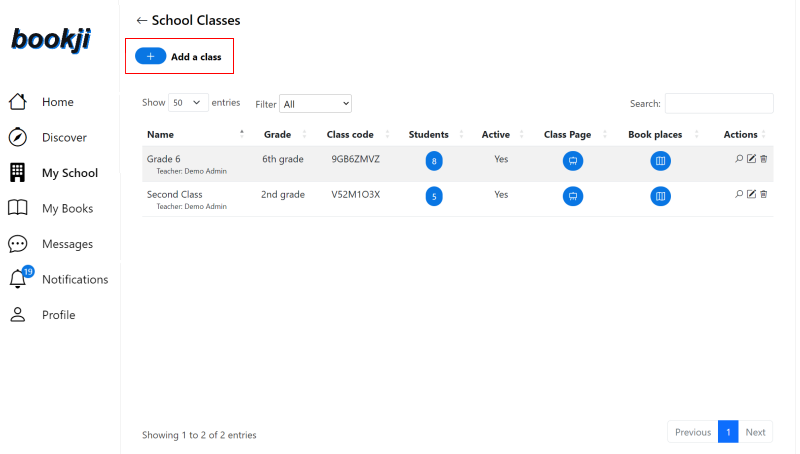
To access the report as an educator, navigate to the My Classes page and click on the Class Management pod. As a School Administrator, click on the My School page and click on the Class Management pod.
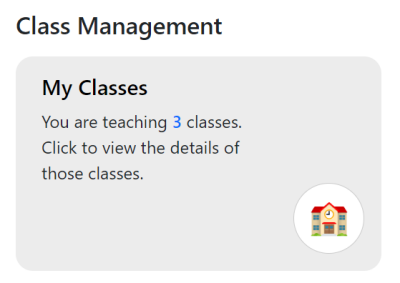
Choose the class for which you want to see the status, and click the icon with three dots .
This action opens a popup menu where you can choose the Class Checklist Progress... menu item.
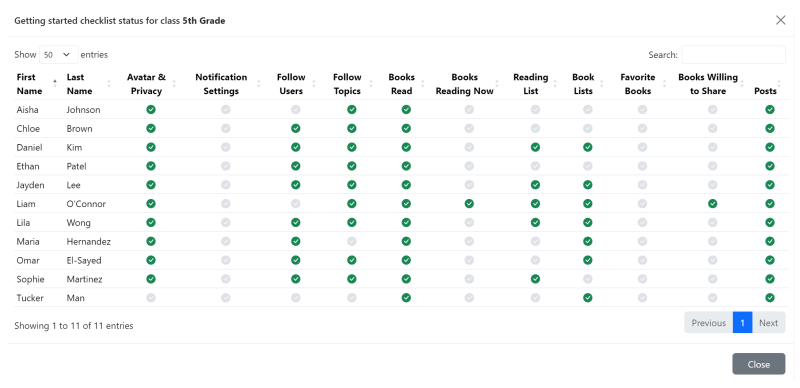
This opens a modal window showing a grid of steps and students. The steps with a green icon have been completed by the student.
The Bookji platform contains quite a number of features. By default, all of the features are enabled and visible out of the box. However, if you wish to roll out Bookji in a staged manner to your students one or two features at a time, you can disable certain features and then turn them on when you are ready.
As the school administrator, log into Bookji and click the 'My School' menu option in the left-side menu. Scroll down until you see the 'School-level Settings & Permissions' and 'Grade-level Settings & Permissions' pods.
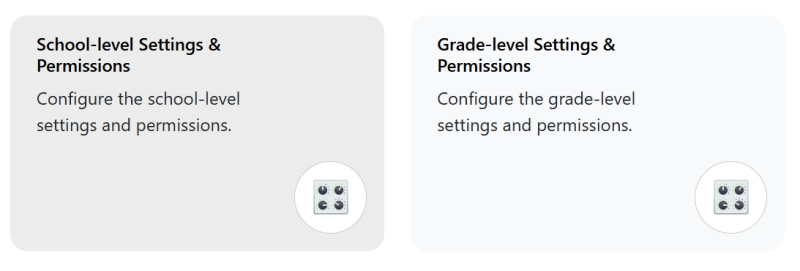
Click the appropriate pod depending on the level at which you wish to disable features. If you choose to disable one or more grade-level features, you will need to select a grade.
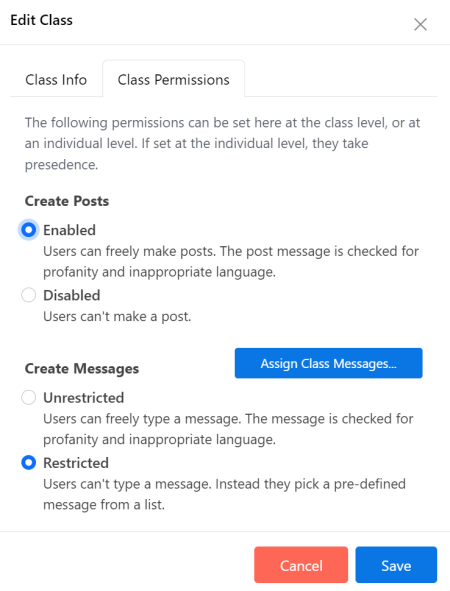
With the Settings & Permissions modal, click on the Permissions tab.
The top section lists the various features you can disable. These include:
- Badges
- Book Map
- Challenges
- Classic eBooks
- Emoji & Genre Search
- Messages
- Posts
- Timeline & Events
- Topics

Upon saving, the disabled features will be hidden from students at that level, e.g., if they are set for 5th grade. For more information on how permissions inherit, see Bookji Permissions.
Please note, however, that school administrators and teachers will still see the feature, allowing you to use it to prepare for a later rollout.
Once you are ready to enable a feature, return to the dialog and save the feature as enabled.
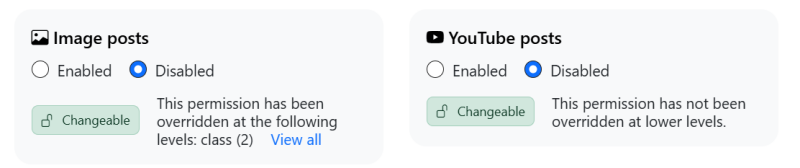
You can set settings and permissions in Bookji at the school, grade, class, and individual student levels.
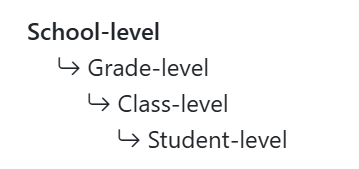
Settings and permissions set at one level inherit/flow down to each child level unless overridden at a lower level. The lowest level permissions are used.
For example, you could disable the creation of YouTube posts at the school level and enable it at the 6th-grade level, then disable it for a particular 6th-grade class or particular 6th-grade students.
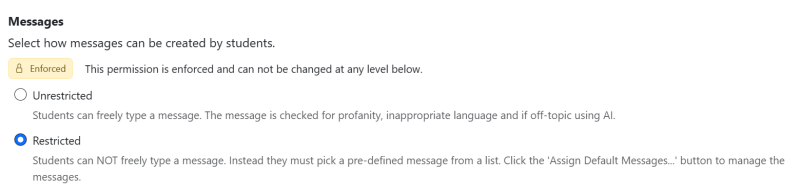
Settings and permissions can also be enforced at any level except the student level, which means they cannot be changed at lower levels. Enforced settings/permissions are designated with a lock icon.
When you open the common 'Settings & Permissions' dialog at a specific level, you will see the various settings & permissions. Although permissions may have different options, you will see the options along with a 'Changeable' or 'Enforced' button and a short message indicating the status of the permission's inheritance. For example:
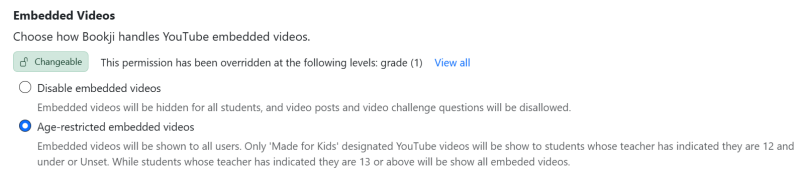
Only school administrators can change the permissions at the school or grade level, while teachers can change the permissions at the class or student level (for classes/students they teach).
It's simple. Click on the 'Profile' menu, then click your existing avatar on the left-hand side of the page.
This action will invoke a dialog where you can choose a new avatar. If you are an educator, you can also upload an image for your profile picture.
Students can do the same but are restricted to picking an avatar and can't upload an image.
![]()
![]()
Yes, you can use your Google account to sign into Bookji.

For more information, see Signing into Bookji with Google SSO.
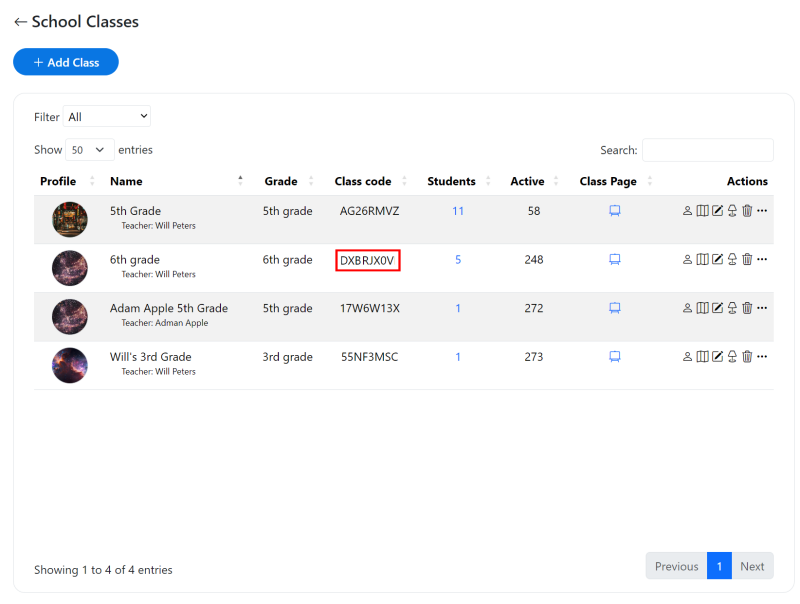
To create a class, navigate to the 'My School' or 'My Classes' menu based on your role. Then click the blue 'Add a class' button.
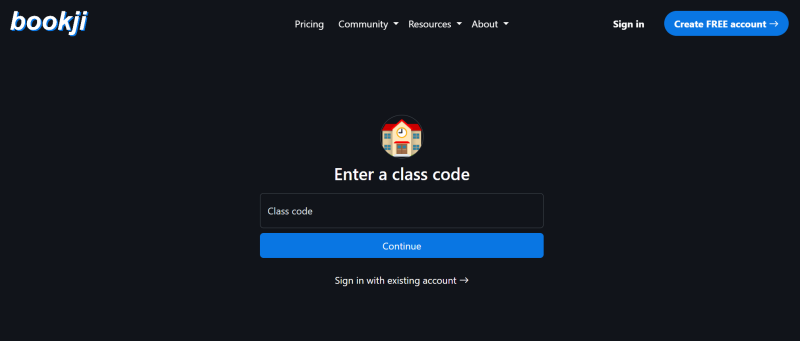
Once you have created a class, the easiest way to add students is to let them register themselves. After creating the class, you will see a unique 8-digit class code.
Provide this code to each of your students and then have them click the Sign In button on the Bookji home. There, they will see a 'Create an account' link, which when clicked, will bring them to this page.

After clicking Student, they will be prompted for their class code.
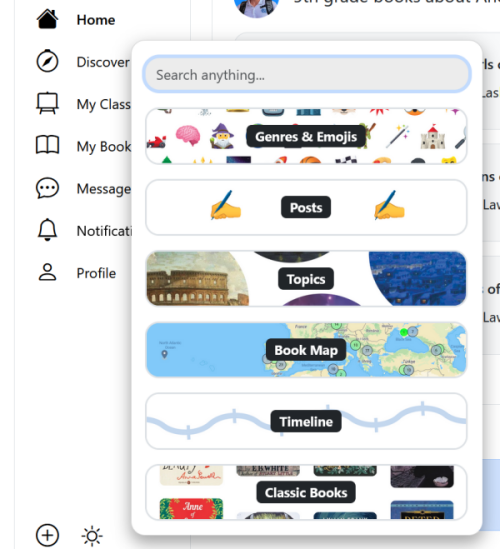
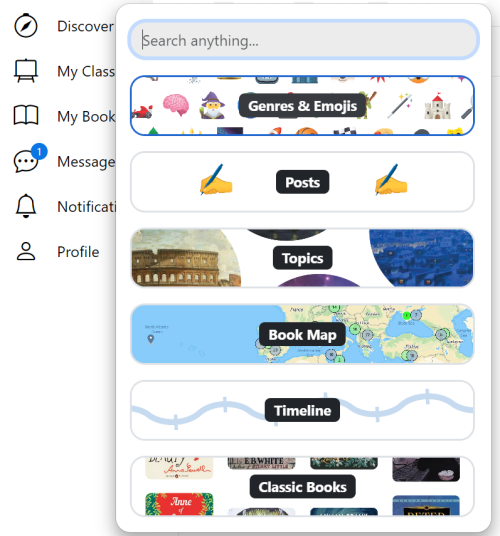
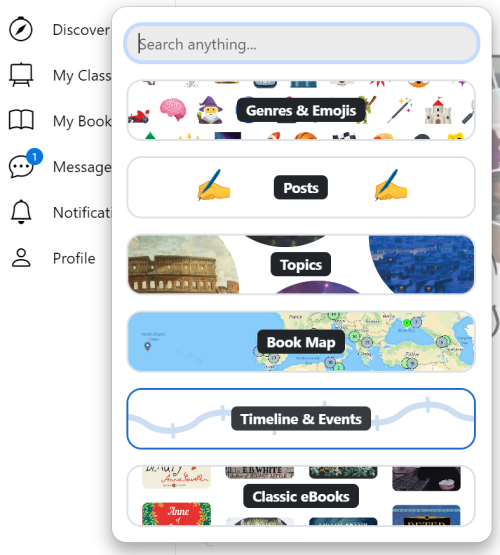
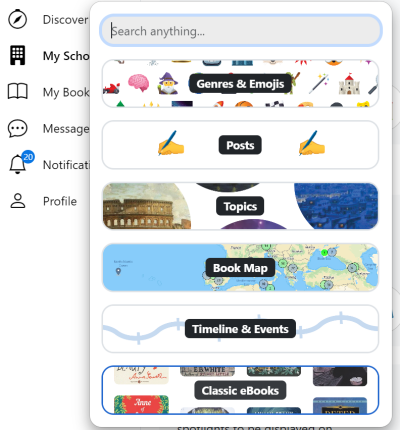
Bookji offers several methods to help students find books they are interested in:
- Full-text Search: Search for books, topics, authors, and users.
- Genre & Emoji Search: Find books by genre and/or emoji reactions.
- Book Map: Discover books by location.
- Timeline & Events Search: Search by when a book takes place or specific events.
- Classic eBooks: Find and read eBooks online.
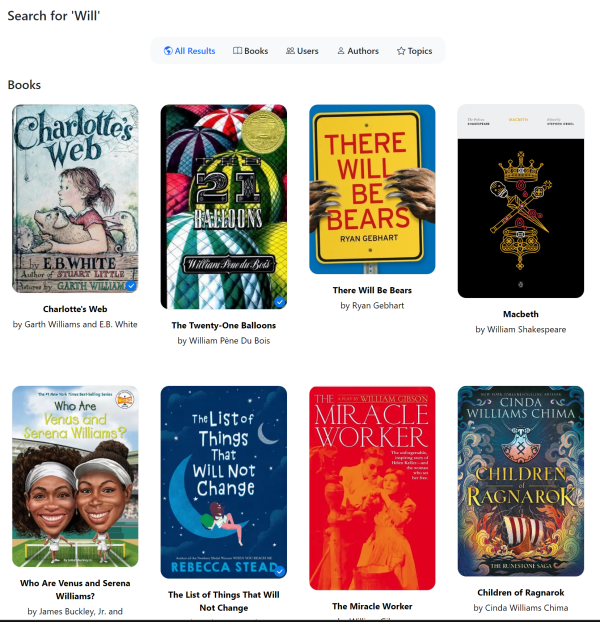
Full-Text Search
The top search input field lets you search for books, topics, authors, and other users. Start typing (at least four characters) to see results.
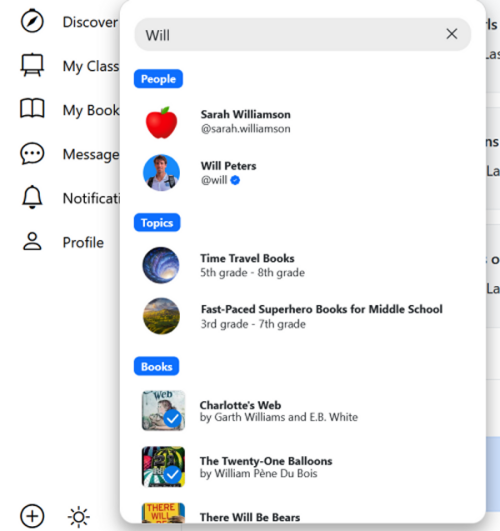
Press the Enter Key to view your results categorized by result type.
Genre & Emoji Search
Use this search to find books by genre and/or emoji reactions.
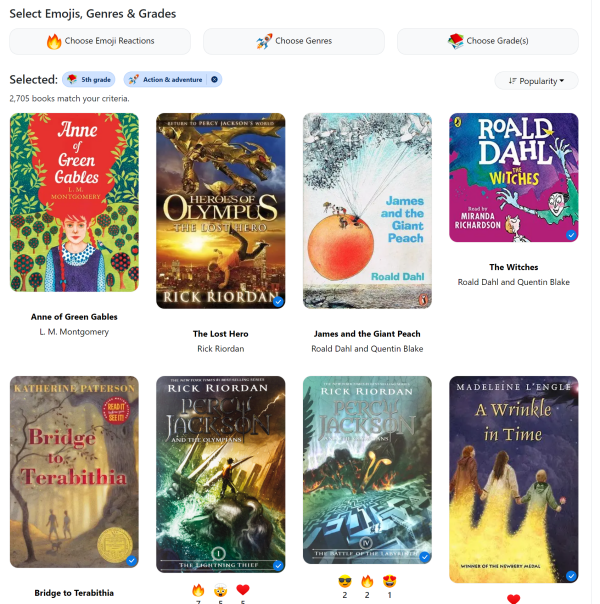
Use the three buttons to define your search criteria: Choose Emoji Reactions, Choose Genres, and Choose Grades.
For more details, see How do I search for a book by genre?
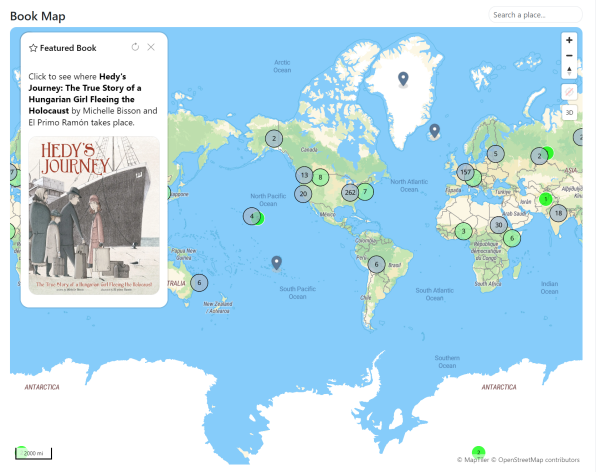
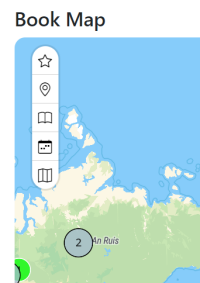
Book Map
Use the Book Map to discover books by their location.
For more details, see How do I search for a book by its location?
Timeline & Events Search
Search for books by when they took place or the events they involve.
For more details, see How do I search for a book by when it took place?
Classic eBooks
Find and read classic eBooks using Bookji's eReader.
For more information, see Does Bookji have eBooks/ePubs?
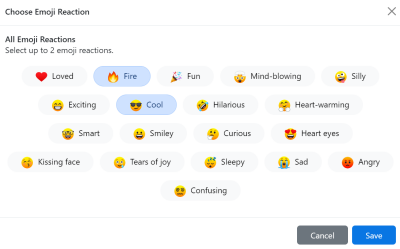
Bookji lets you search for books by genre and/or emoji reactions. Simply click on the 'Discover' icon in the left-side menu and select the 'Genre & Emoji' option.
This opens the Genre and Emoji Reactions search page.
Define your search criteria by clicking on the following buttons:
- Choose Emoji Reactions...
- Choose Genres...
- Choose Grades...
If you want to search by emoji reaction, click the 'Choose Emoji Reactions' button to select up to 3 emoji reactions.
If you want to search by genre, click the 'Choose Genres' button to select up to 3 genres. Some genres may have sub-genres.
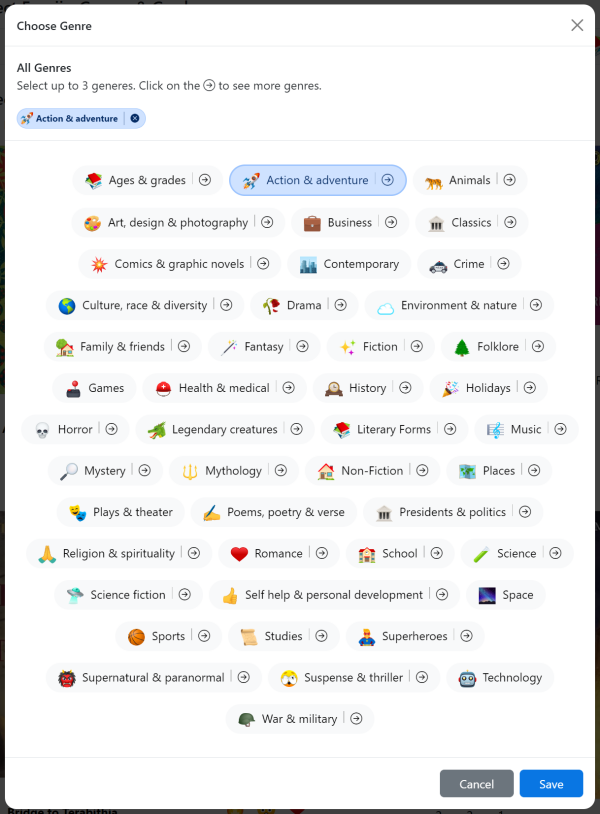
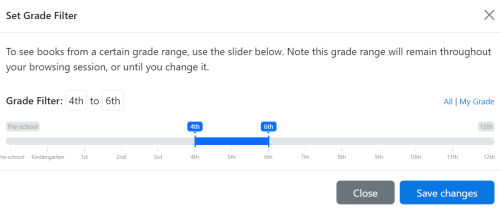
To change the grade filter, click 'Choose Grades' to limit the books to that grade range.
Adding more filters reduces the number of books returned.
Discover books by location using the interactive Book Map. Click on the Discover icon and select the 'Book Map' pill.
This opens the Book Map page.
Click a book in the upper left corner to zoom into its location. You can also close this popup to see additional filters.
On the map, light-green circles represent country/state-level locations, while grey circles indicate city-level locations. Click on either to zoom in.
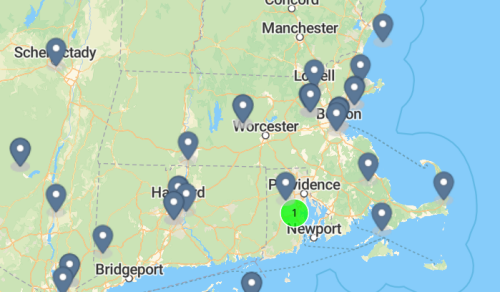
Hover over markers or circles to see a list of books at that location.
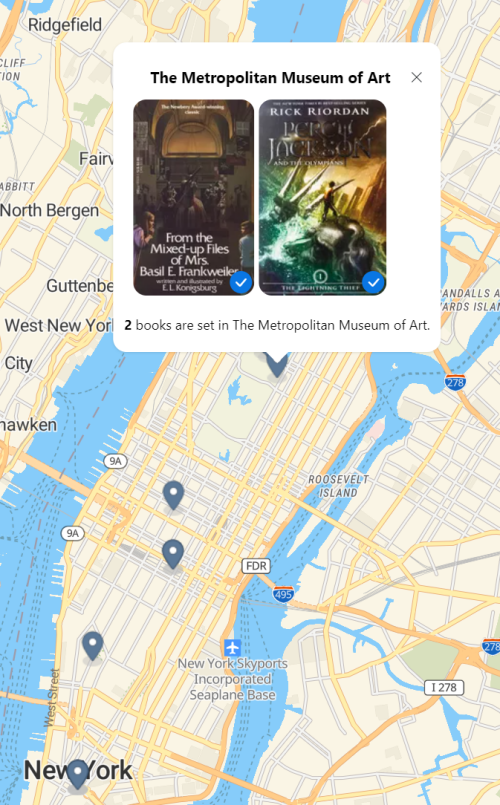
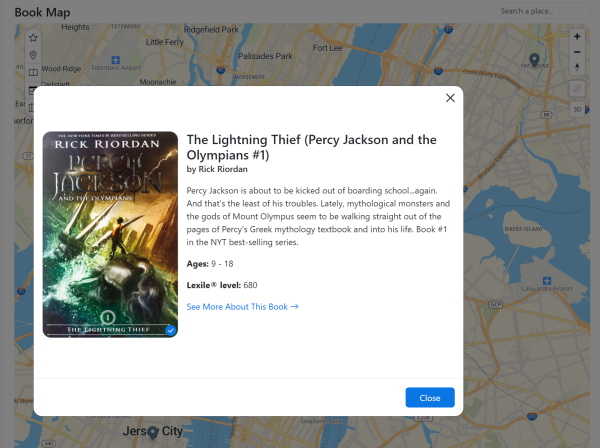
Click a book to view more details.
Yes! Bookji allows teachers and students to personalize their homepage experience based on what is most useful or relevant for their reading journey.
Teachers can customize the homepage by selecting preferred content types like book posts, challenges, achievements, and more. Students can also choose what to highlight based on their reading interests.
To customize your homepage, click the icon in the upper left-hand corner of the home page.
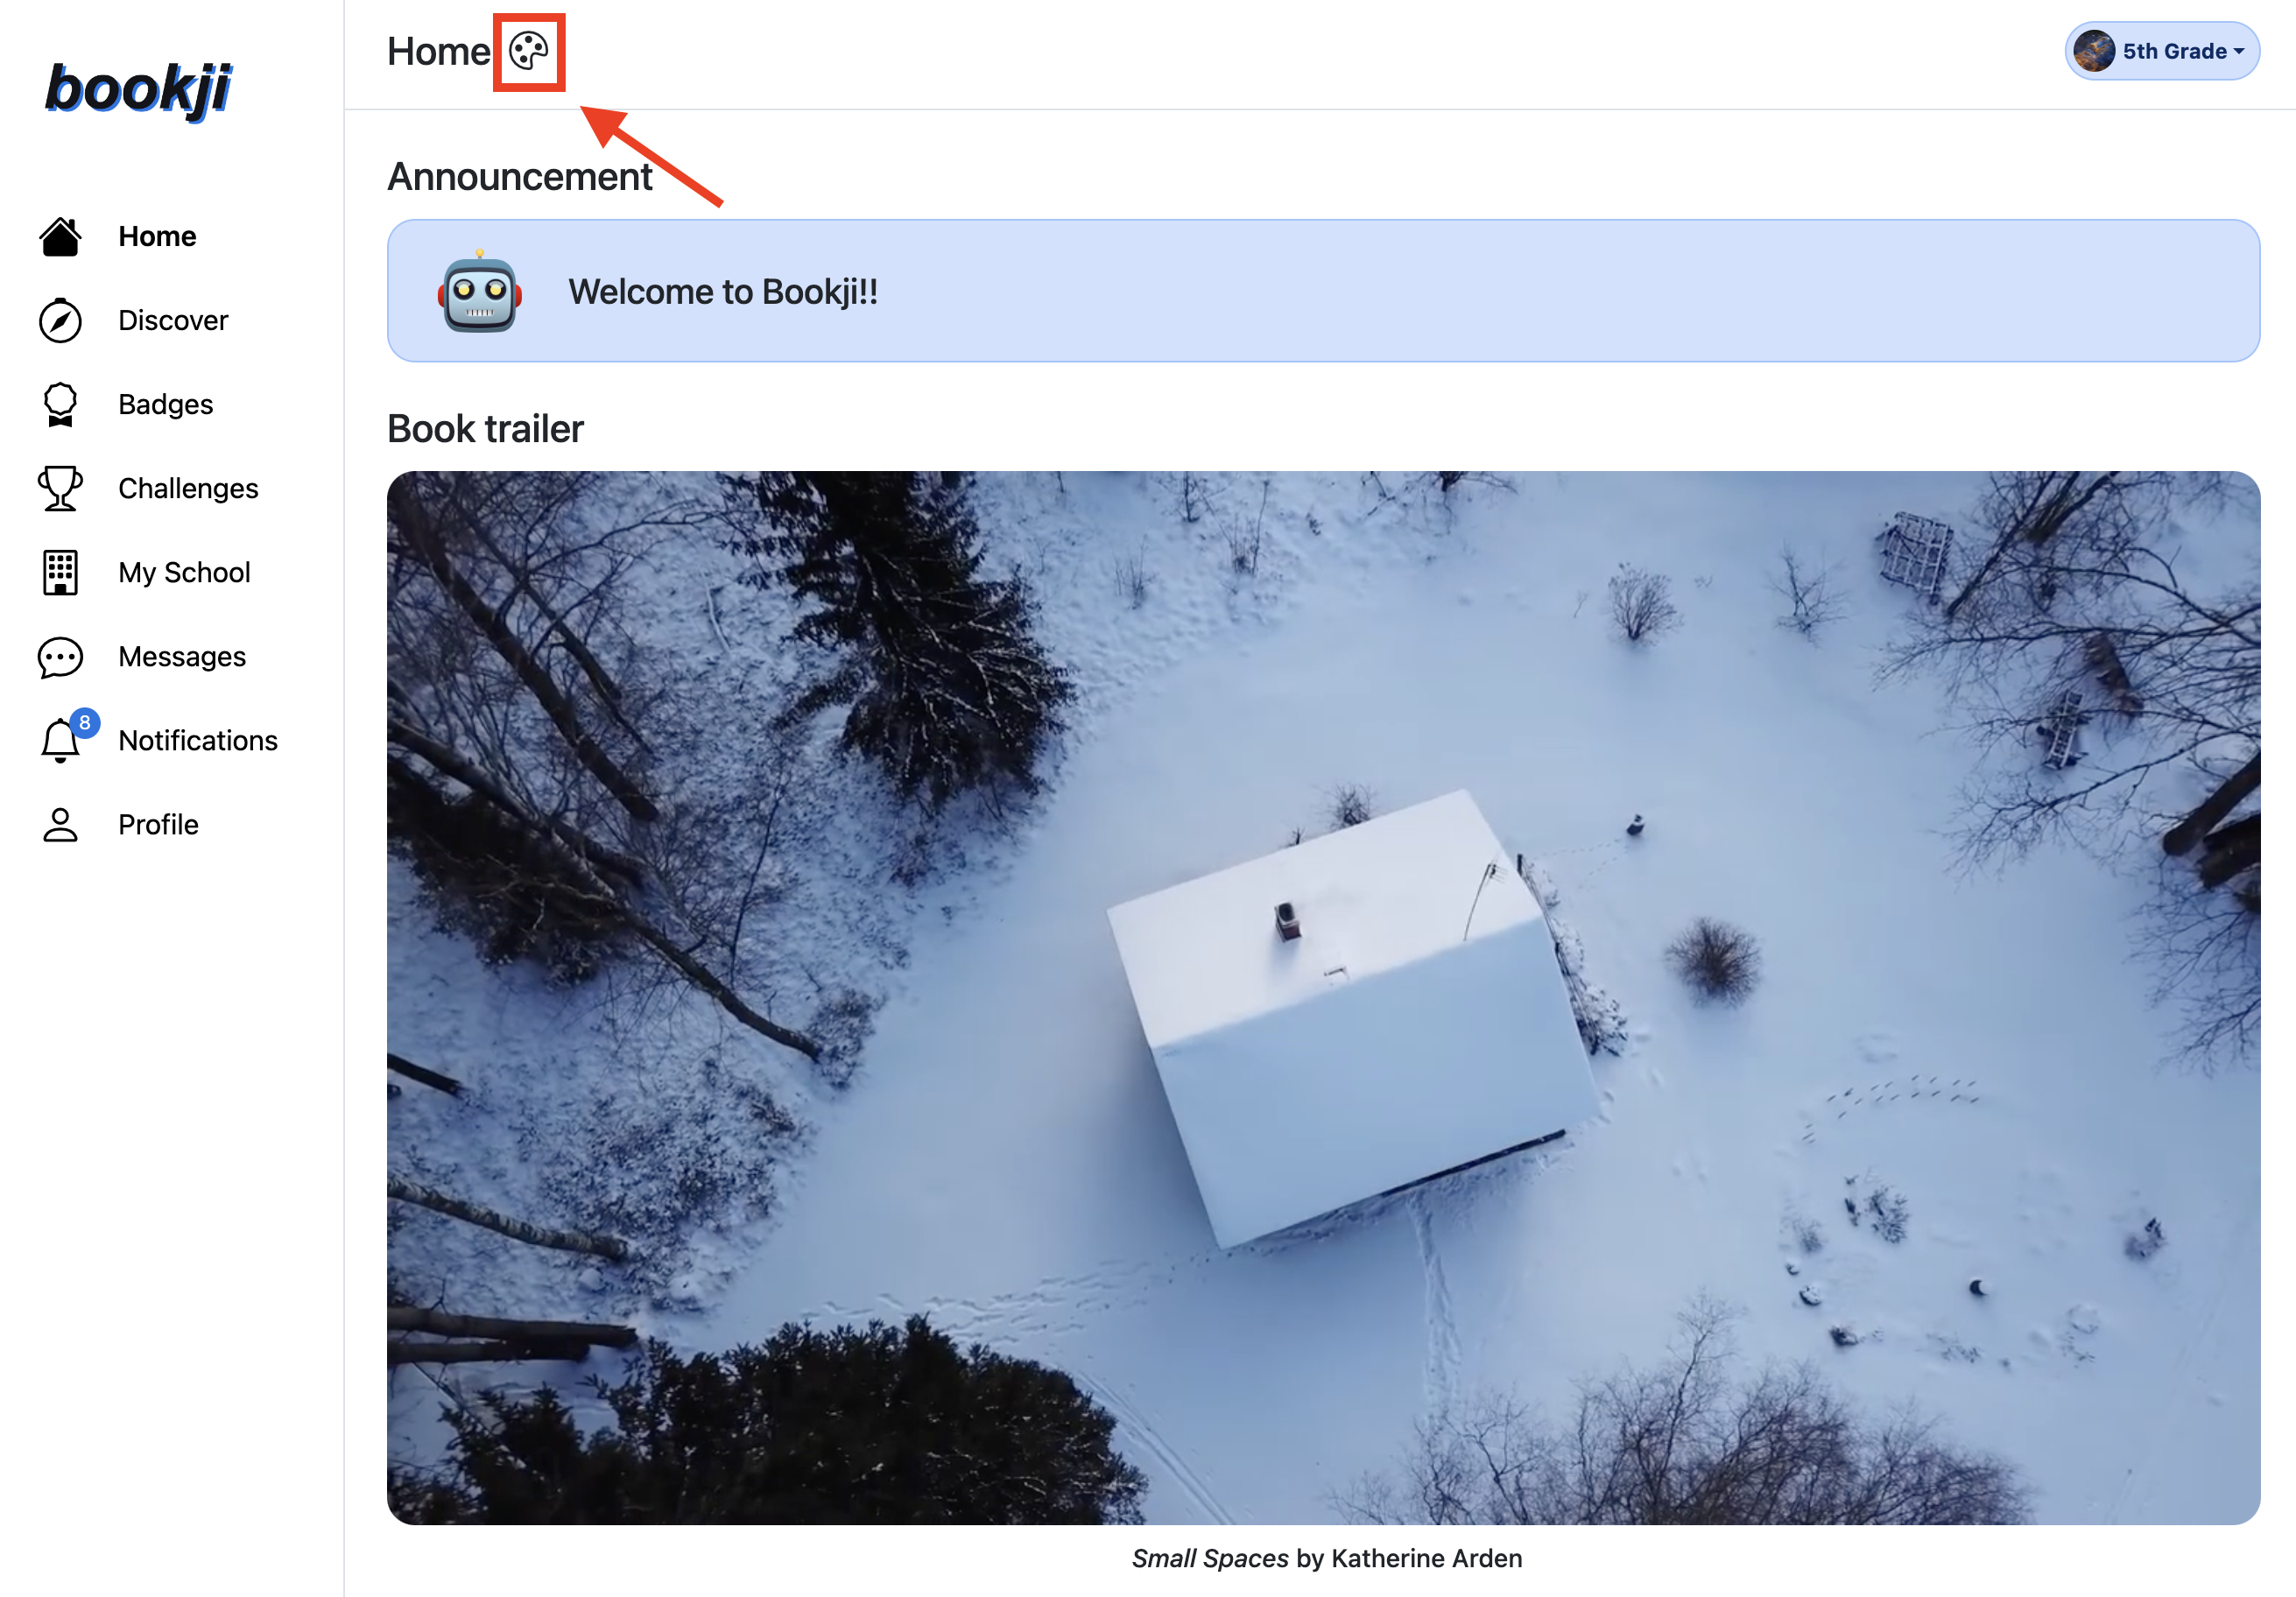
Once you're on the customization page, drag and drop sections like achievements, reading goals, and book recommendations to rearrange them to your liking.
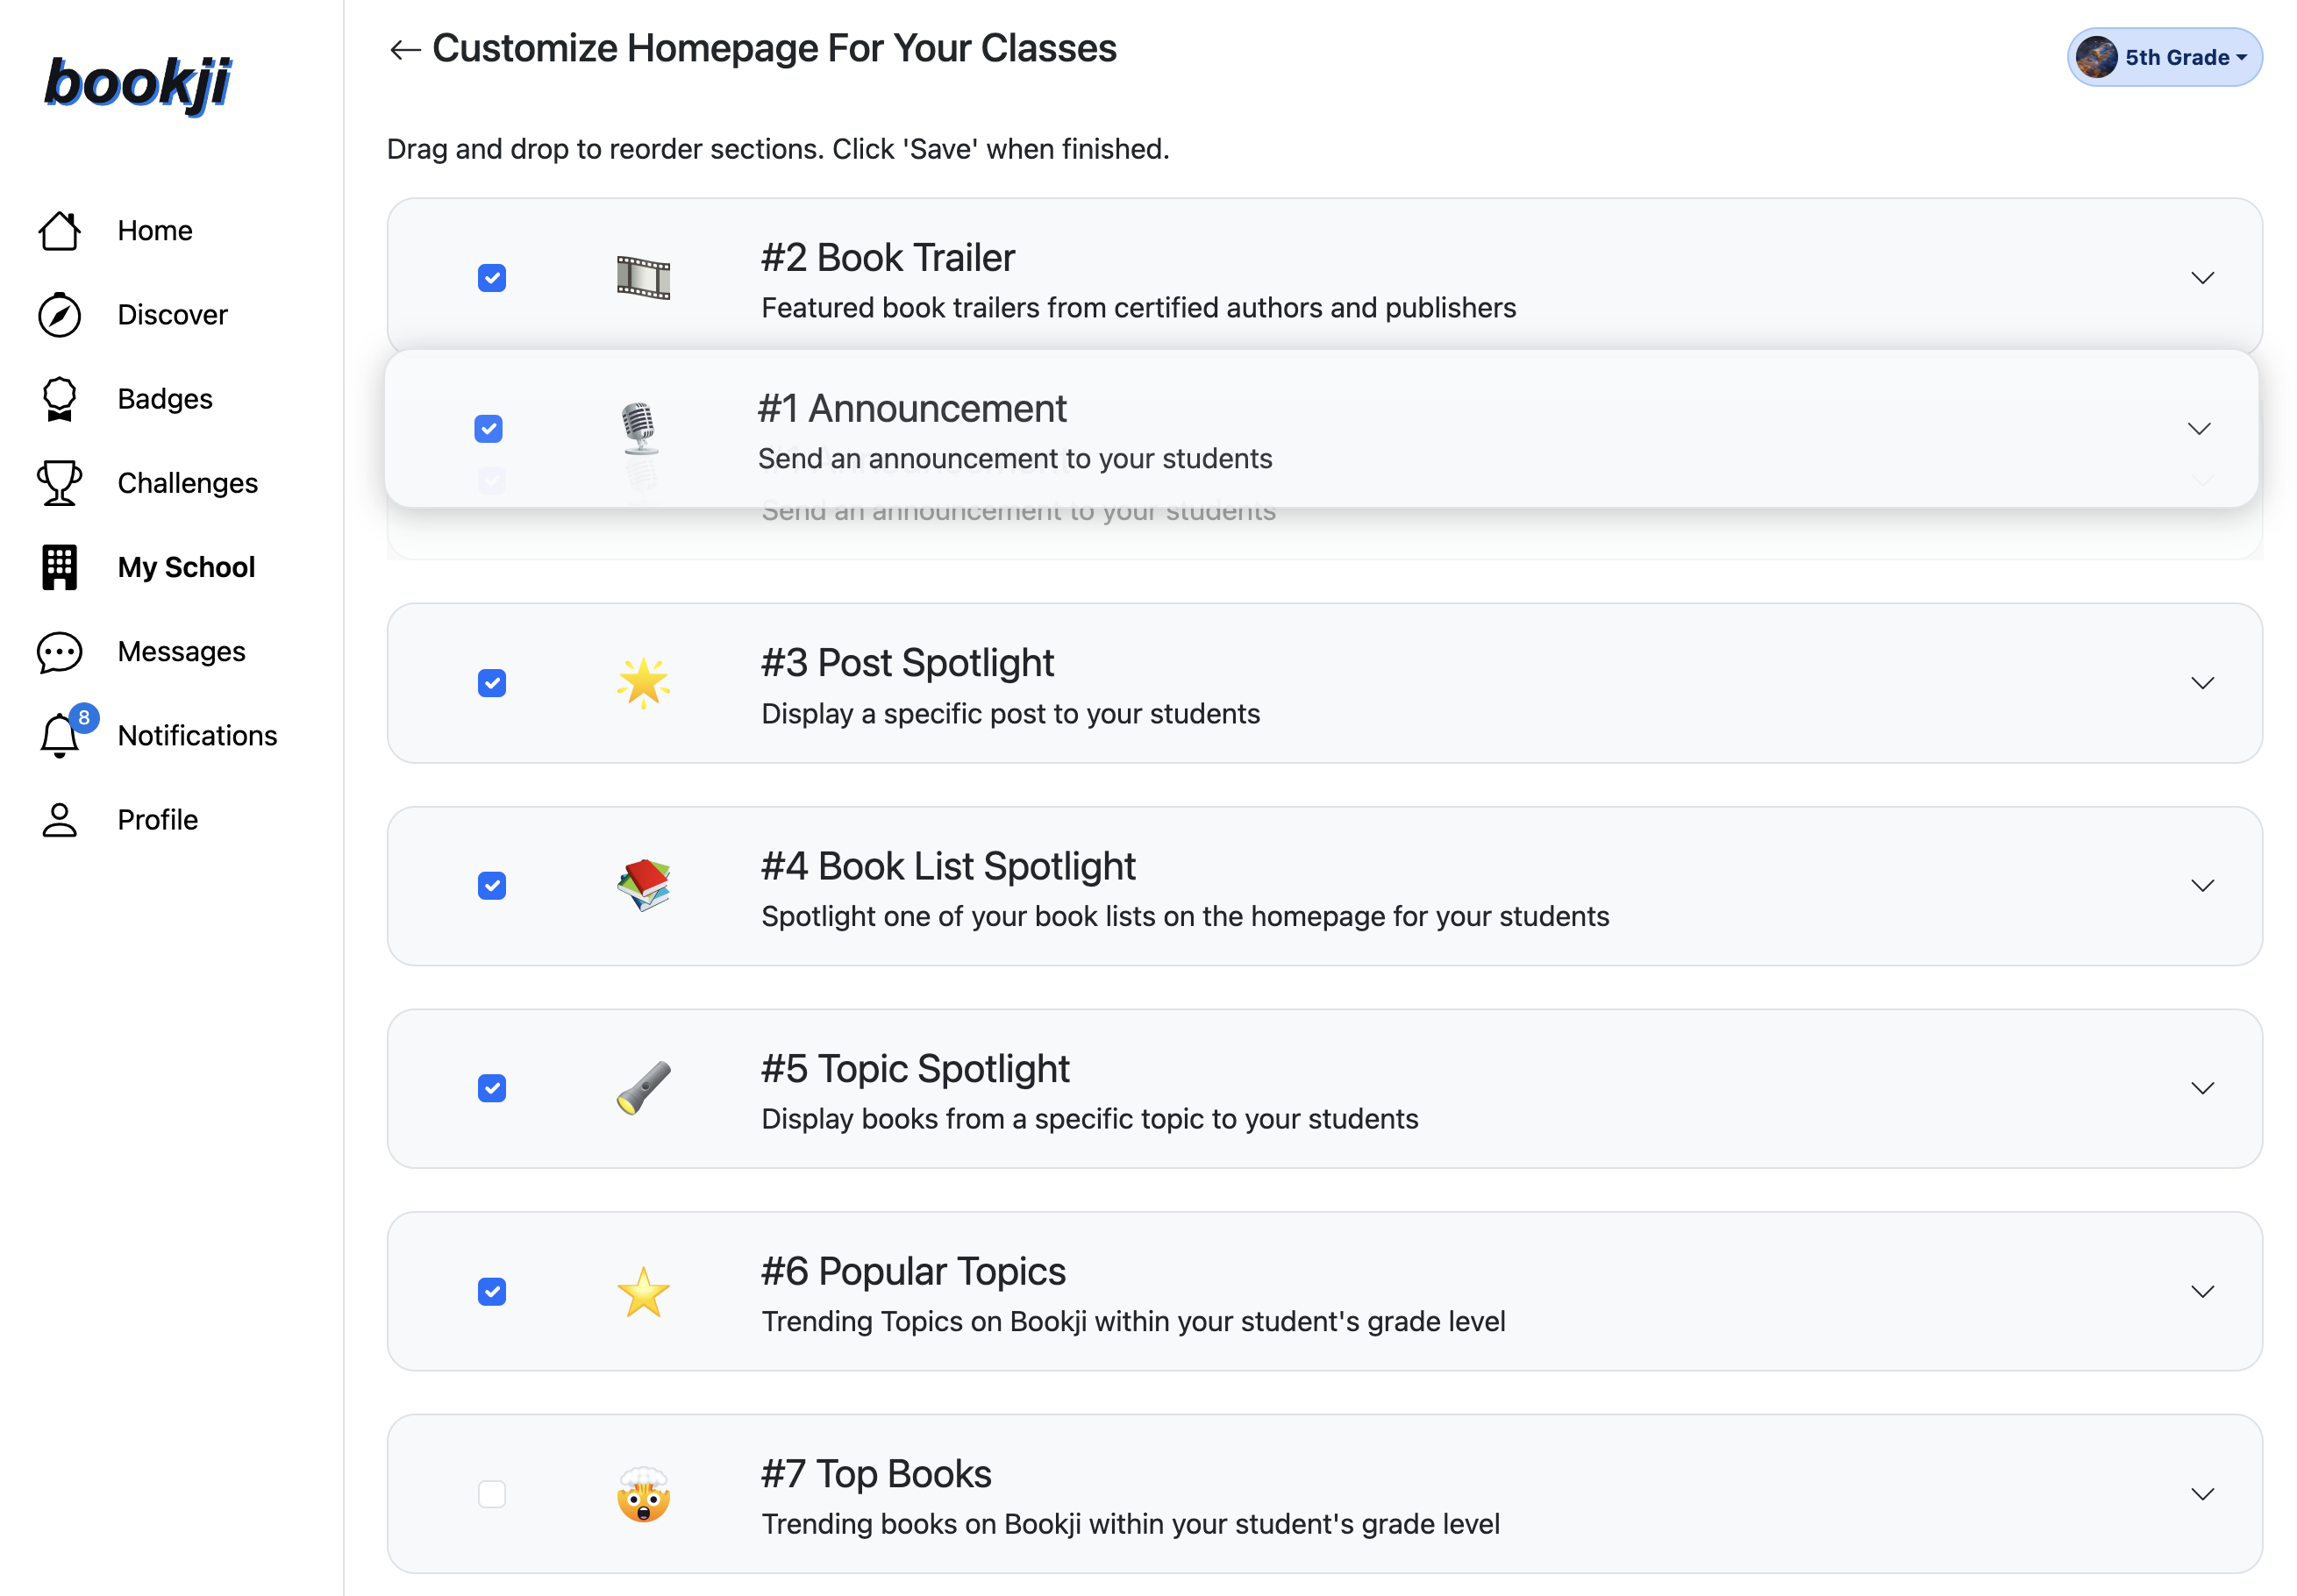
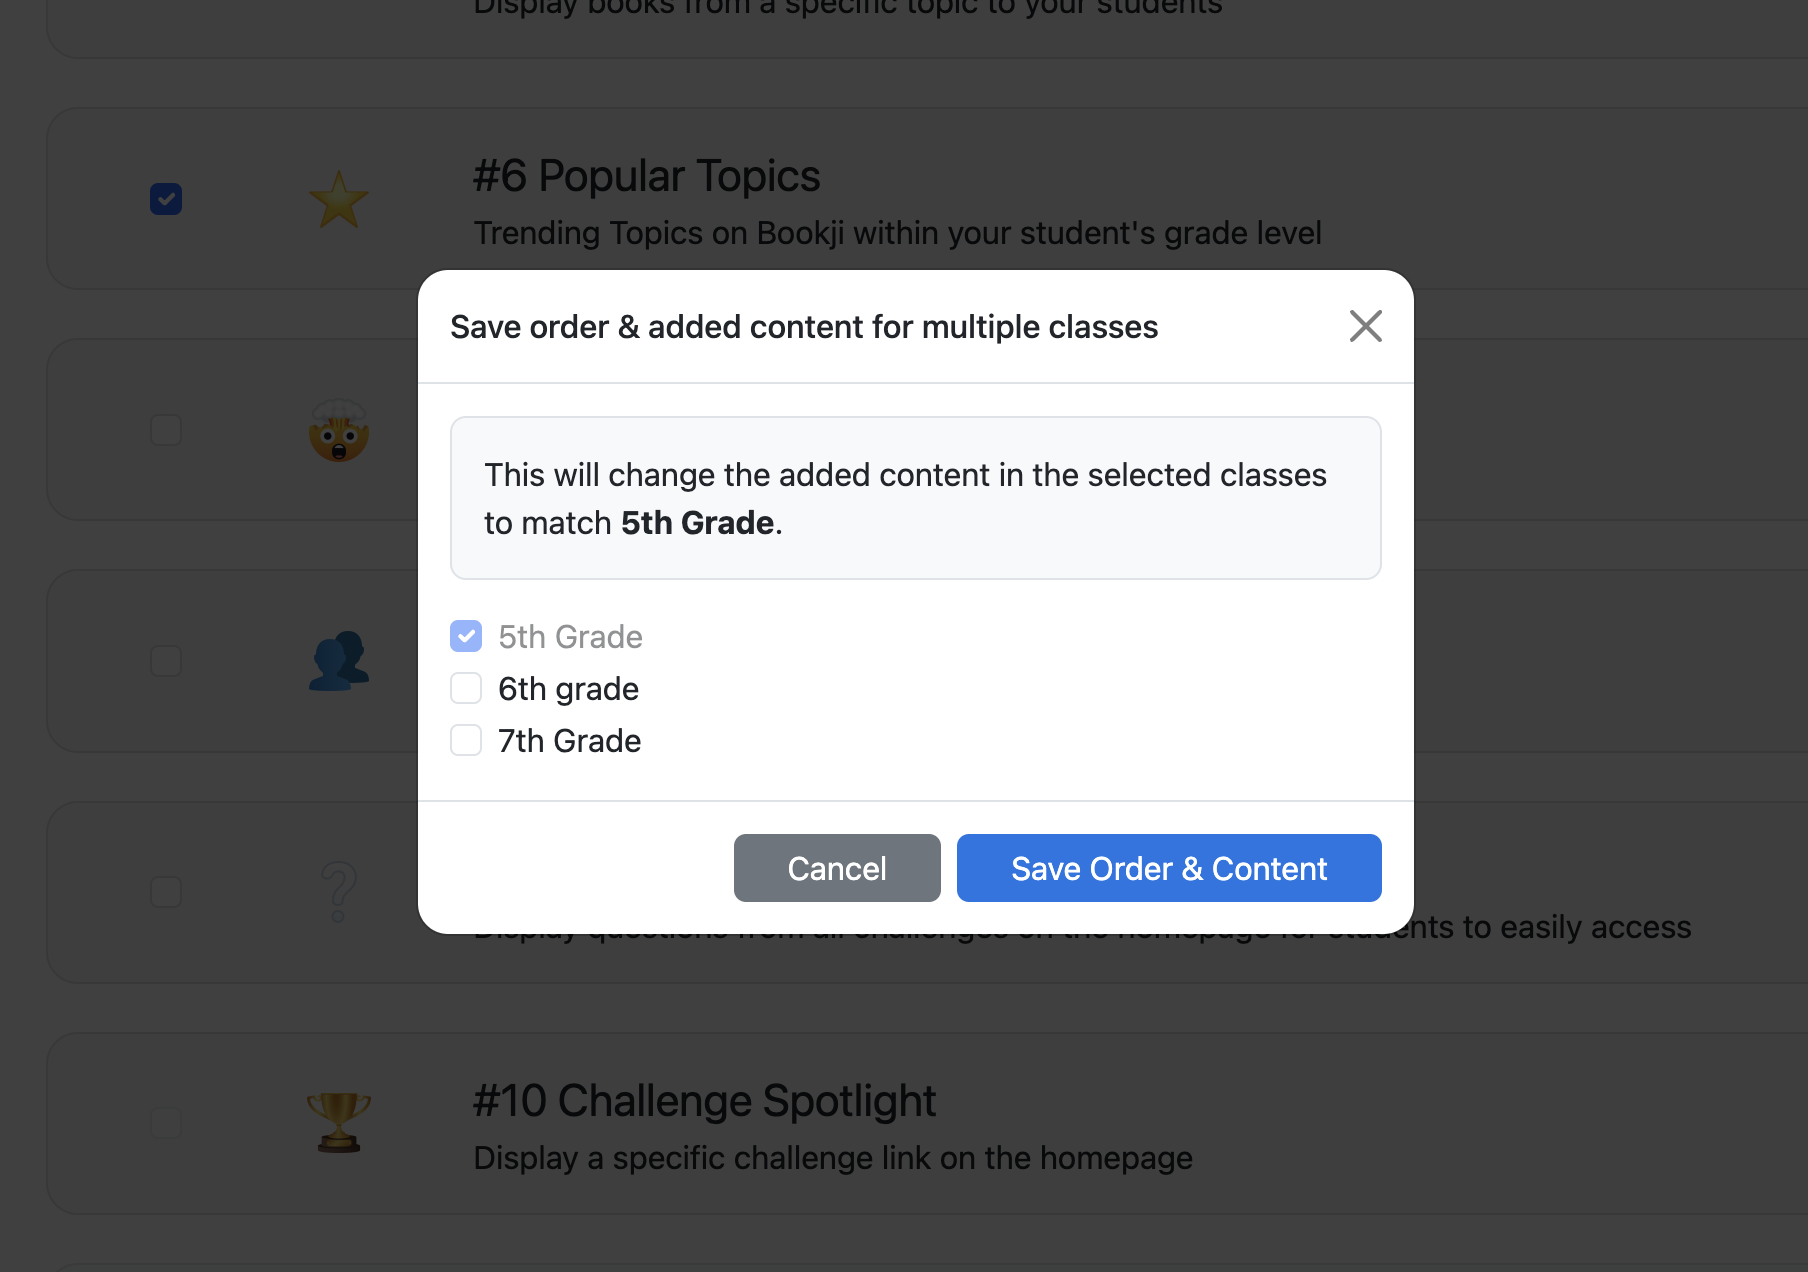
Make sure to save your changes so your personalized homepage is ready every time you and your students log in!
Bookji aims to empower all students to become responsible digital citizens by helping them understand the impact of their online actions, fostering respectful interactions, and encouraging critical thinking about the content they post, share, and consume.
To support schools in cultivating these skills, Bookji leverages AI to automatically detect inappropriate or off-topic content, minimizing the need for manual monitoring. Our AI-driven tools ensure a safe and constructive digital environment, allowing students to focus on meaningful engagement.
Administrators can further customize the experience through Bookji's 'Digital Citizenship' settings. Go to the My School page, then click the 'Digital Citizenship' pod.
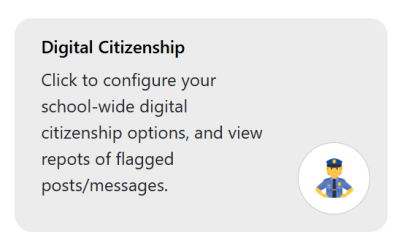
Here you will see four tabs:
- Overview - provides a quick overview
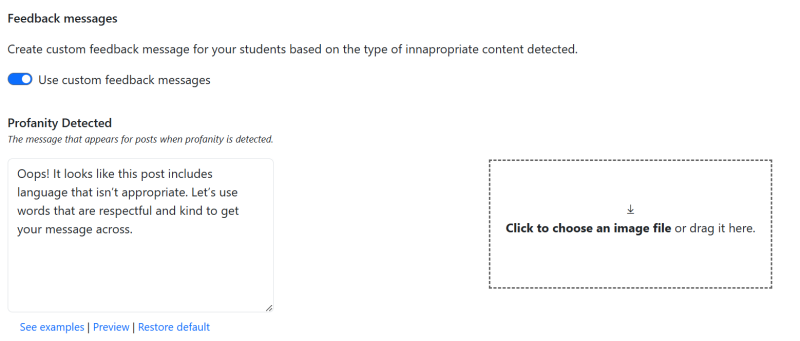
- Customizable Warnings - This allows you to define a subtle custom message that is shown to your students when they start typing a post or a message.
- Personalized Feedback - This allows you to customize feedback messages when Bookji's AI detects profanity, toxicity, or personal information in a post or message.
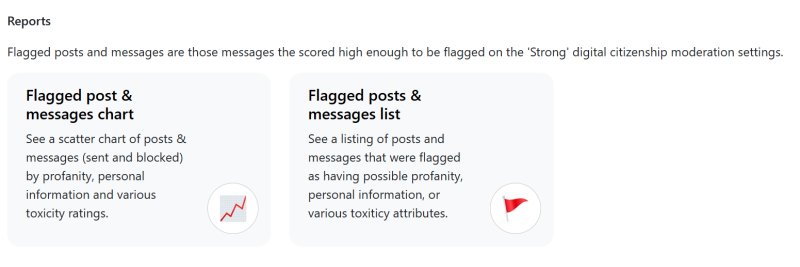
- Reports - Select from a chart or listing to see posts and messages that were flagged inappropriate to help educators identify trends and address concerns proactively.
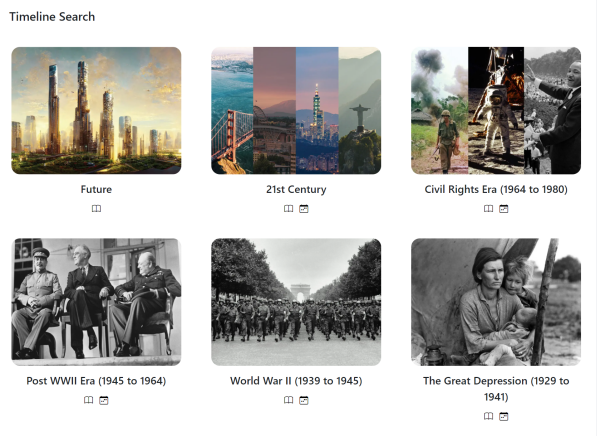
Bookji lets students discover books by when they took place, or by a specific event the book is about.
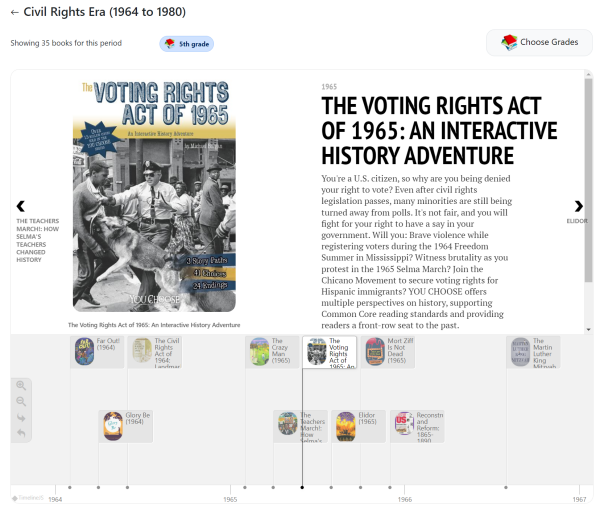
Click on the Discover icon in the left-side menu, then click the 'Timeline & Events' pill.
This action opens the Timeline Search page.
Here, you will see several pods representing certain periods in history. Clicking one of the pods or the book icon will open the timeline page, showing the books associated with that period.

You can scroll the bottom half of the page to see more books.
Clicking a book and scroll the top half of the page to that book.
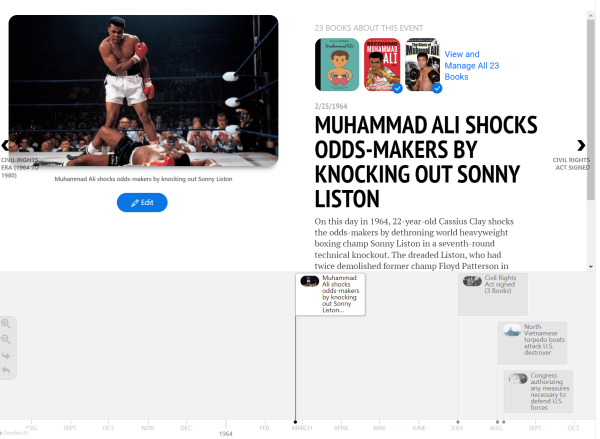
To see specific events for a period, return to the main Timeline Search page and click the calendar icon .

This action will open a similar interface, except instead of showing books, it will show events that happened during this period.
Similarly, you can scroll to the top or bottom of the page to see more events.
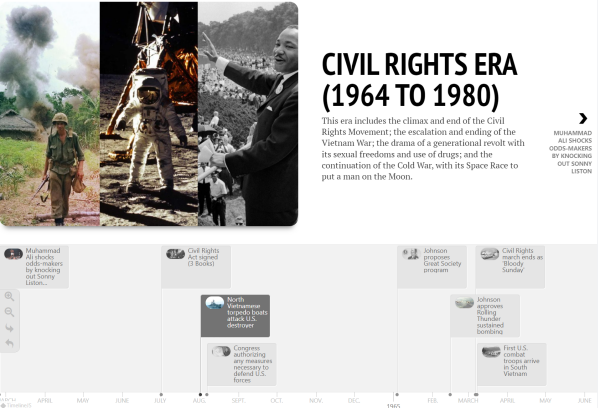
Clicking on an event will scroll the top portion of the page to that event, showing the books associated with that event.
Posts are one way students and educators can share thoughts about books with their classmates and schoolmates. They are like posts on other social media platforms but are related to books.
To access the Posts page, click the Discover menu, then click the Posts pill.
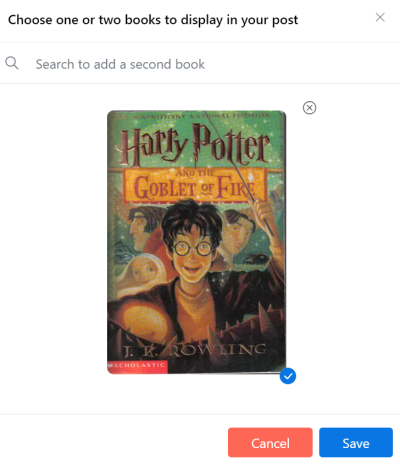
You can create the following different types of posts:
- Text Post - includes only a text message
- Book Post - consists of the cover image of the book and a message
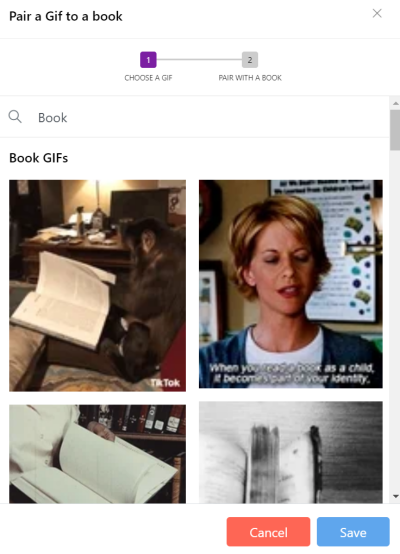
- GIF Post - consists of an animated (G-rated only) gif, the book's cover image, and a message
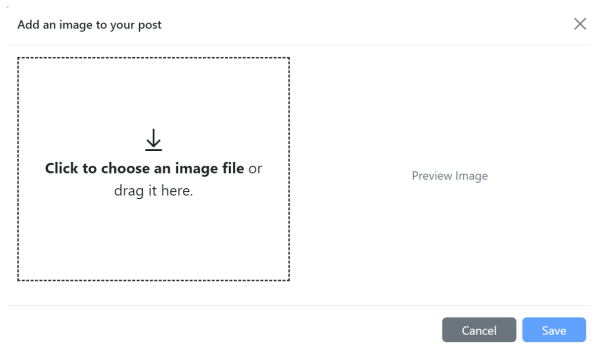
- Image Post - includes an image and a message
- Book List - references a book list that you have created
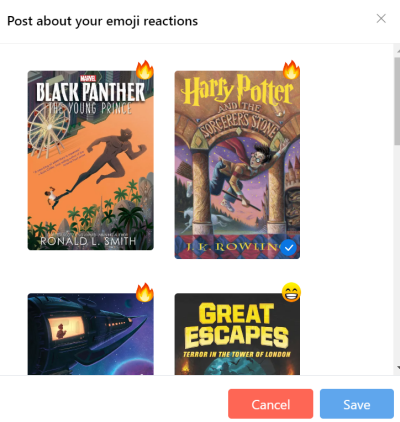
- Emoji Reaction Post - consists of the book's cover image, your reaction to it, and a message
- Poll Post - consists of a simple one-question poll
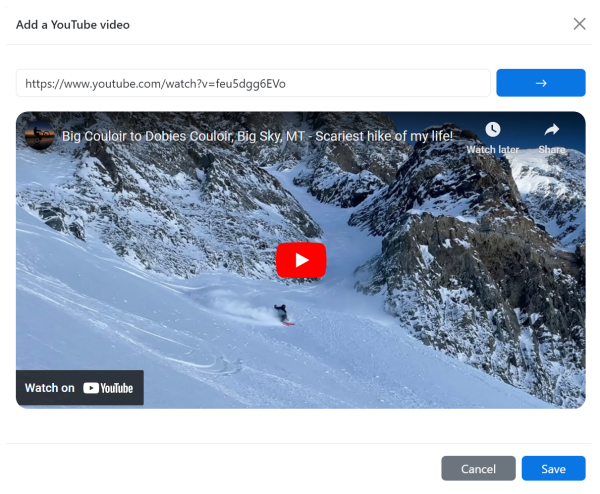
- YouTube Post - consists of a YouTube video, the book's cover image, and a message
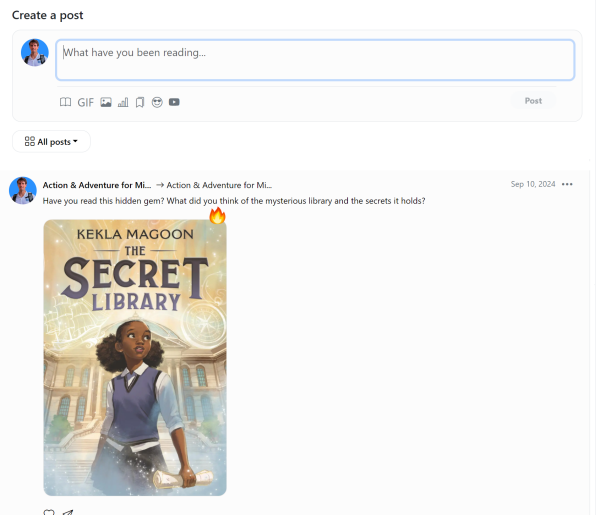
Users can create posts from the Posts, My Class, and Topic pages.
At the top of each of these pages you will see an input field with a set of icons underneath it. Once you start typing the title for your post in the input field, a button is also presented where you can choose the audience for your post.
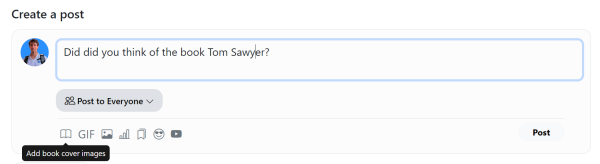
By default, without clicking one of the icons, you will create a plain text post. To create a Book, GIF, Image, Book List, Emoji Reaction Poll or YouTube post, click the corresponding icon and you will be prompted for the pertinent information for that type of post.
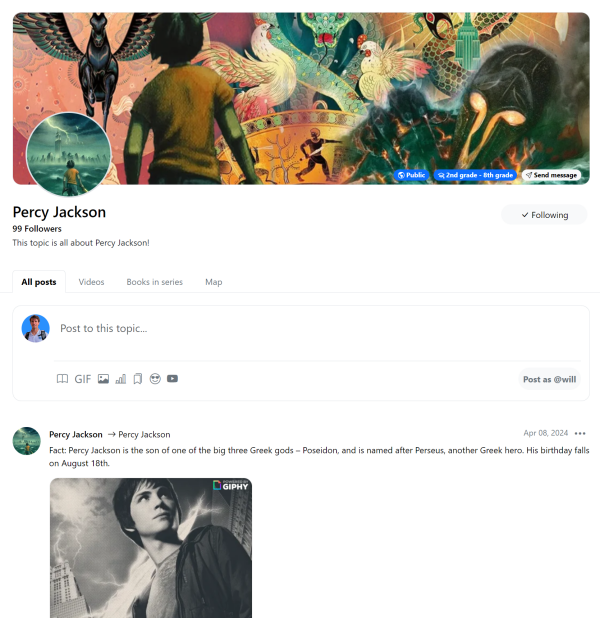
A topic is a collection of books and posts about a specific subject matter. Only educators can create posts in Bookji, but students and educators can follow topics they are interested in.
To access the Topics page, click the Discover menu, then click the Topics pill.
The 'Topics' page shows a 'My Topics' section, listing the topics you follow and other popular topics in each category.
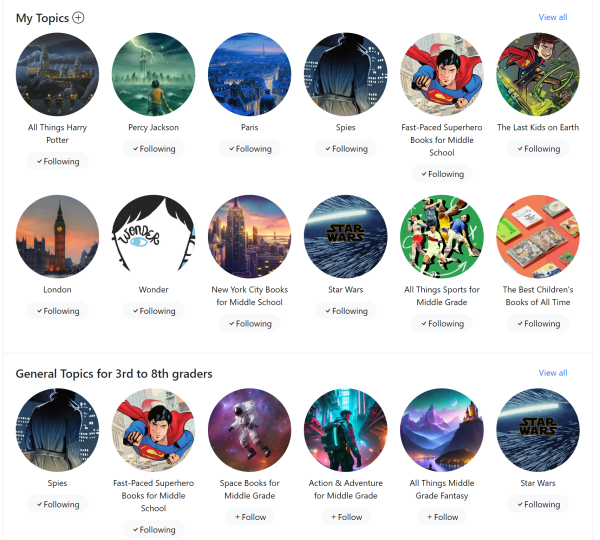
You can create the following different types of topics:
- General
- Author - about a specific author
- Instructional - an instruction topic for educators only
- Location - about a geographical place or region
- Book - about a particular book
- Series - about a specific book series
When you drill into a topic, you see all the posts about it, the associated books, and any book video trailers, plus a map of where books related to that topic occur.
Yes. Bookji lets you turn off posting at a class or individual student level.
For more information, see Disable posting.
Yes. Designated educators or students can post to all students in a specific grade by providing them with the appropriate permissions.
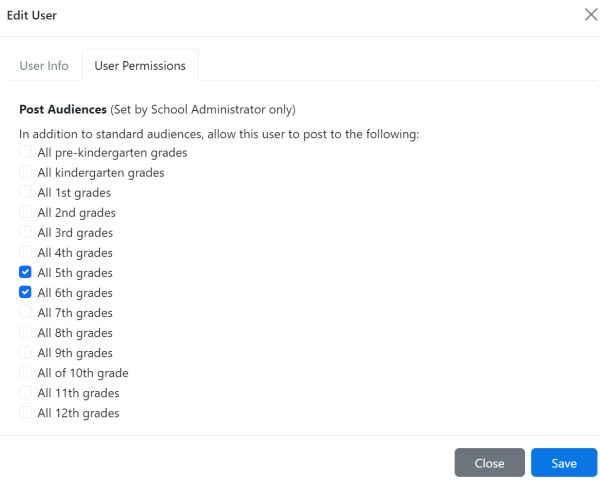
Only the School Administrator can grant the desired Post Audiences permissions to the user from the Permissions tab within the Edit User dialog.
From the My School Page, click on either the School Educators or School Students pod, then click the pencil icon to invoke the Edit User dialog. Then click on the Permissions tab.
Here, you will see a Post Audiences section listing grades Pre-school through 12. Check the grade levels you want to allow this user to post to.
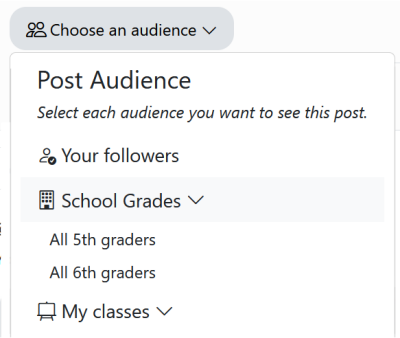
Then, when that user goes to make a post on the Posts page and clicks the 'Choose an audience' button, they will see a School Grades menu that, when clicked, shows the grades to which they can post.
By default, Bookji's messaging feature allows students to compose their messages freely. We run profanity and inappropriate language checkers against their messages, but if you are concerned about students writing inappropriate messages, you can restrict what messages the student can send by selecting or creating predefined messages at a class or individual level.
For more information, see Restricting user messages.
Yes. Bookji allows educators to view the messages their students are sending.
To do this, navigate to My School > My Classes, drill down to the desired class by clicking the count of students, and click the envelope icon for the desired student.
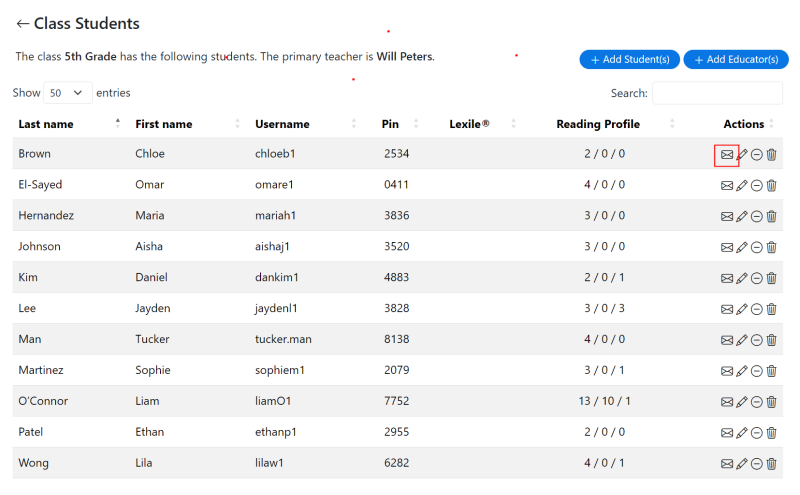
This action will open the 'Messages' page, where you can see all message threads, like the actual student would. However, all messaging features are disabled.
The name of the student for whom you are viewing messages is in the page's header.

Yes, as educators, we trust you to make edits (and additions) about books and authors. If you see something incorrect, we encourage you to correct it.
To edit information about a book, click on the book to be taken to the 'Book Detail' page.
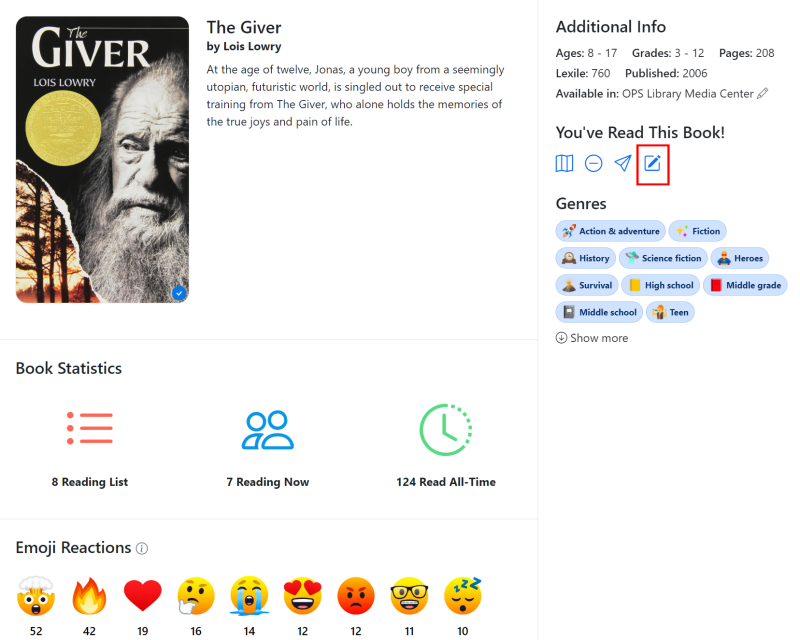
You will see a blue 'Edit Book' pencil icon in the right-hand column. Click that icon to navigate to the Edit Book page, where you can view and edit all the details about the book.

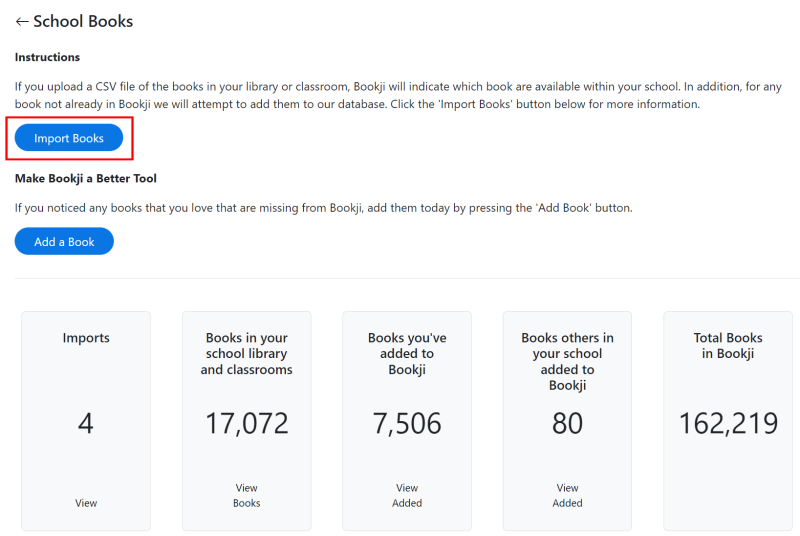
To add a book, navigate to 'My School' and click on the 'Import My Books' pod.
Then click on the 'Add a book' button.
To edit information about an author, click on the author's name when on the 'Book Detail' page, and this will take you to the 'Author Detail' page. A blue 'Edit Author' icon will be in the upper right corner.
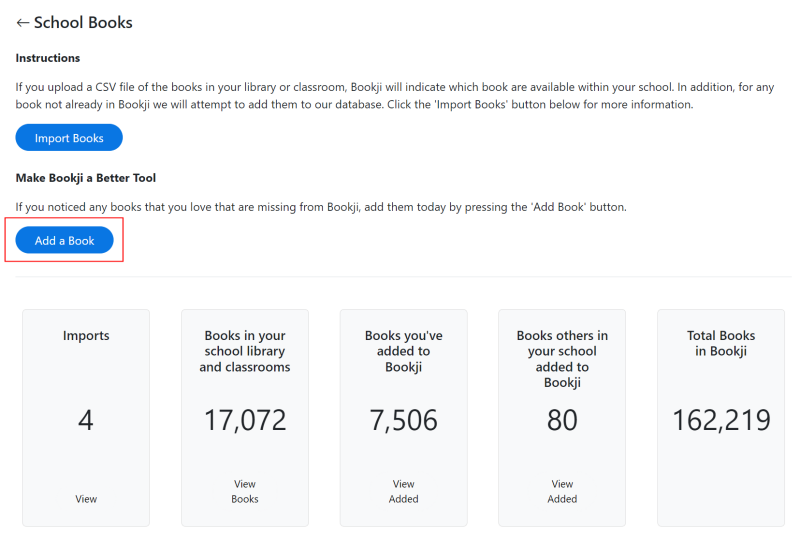
Bookji supports two ways of importing books from your library catalog.
To start, navigate to 'My School' or 'My Classes' and click on the 'Import My Books' pod.
There, you will see specific stats about the books in your library and the books in Bookji. Click the blue 'Import Books' button.
On the next page, you will see two import options in Step 1:
- Import from Follett's Destiny formatted CSV file
- Import from Bookji formatted CSV file
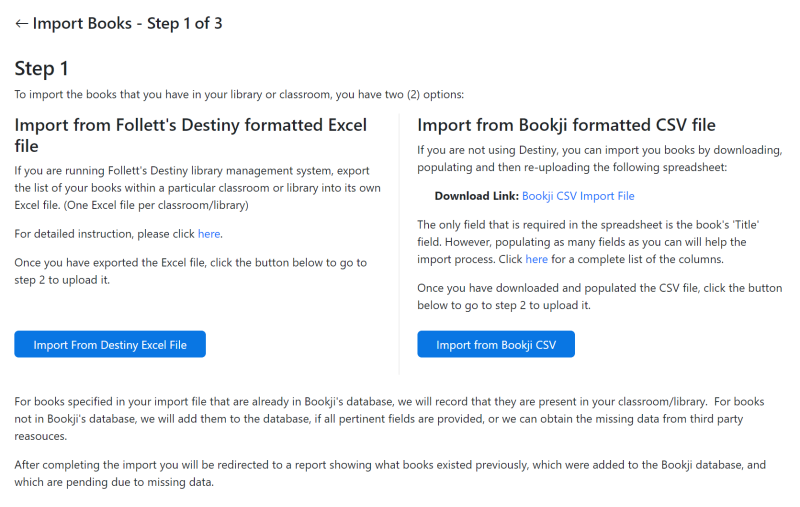
If you use Destiny to manage your catalog, you can export a listing of your books and then import it into Bookji. For detailed instructions, see Importing Books from Destiny.
If you don't use Destiny, we provide a generic CSV (comma-separated value) file format import facility. For detailed instructions, see Importing books from non-Destiny systems.
After you import your books, you will see a blue checkmark icon in the lower right corner of any book in your library or one of your classrooms. Hovering over that icon will display the book's location.
It means that this book resides in your library or one of your classrooms.
If you hover over the icon, it will display the book's location.
To correct a book's location, navigate to its 'Detail Page' and click the pencil icon.
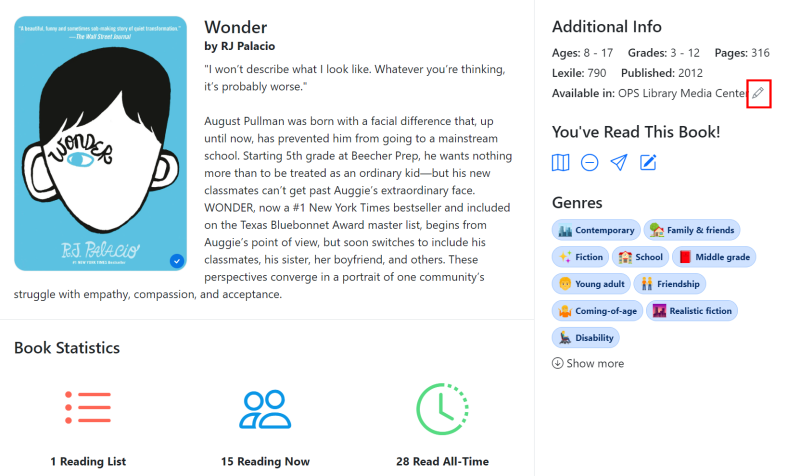
This action will open a dialog where you specify the location.

Bookji allows you, as an educator, to schedule the spotlighting of books from a topic on the homepage. The spotlighted books will appear under the main video trailer on the Bookji homepage. You can also specify whether the video trailer is pulled randomly from one of the spotlighted books.
Topics in Bookji can contain posts about a particular subject matter and a list of books. These books can then be spotlighted on the Bookji homepage for your students.
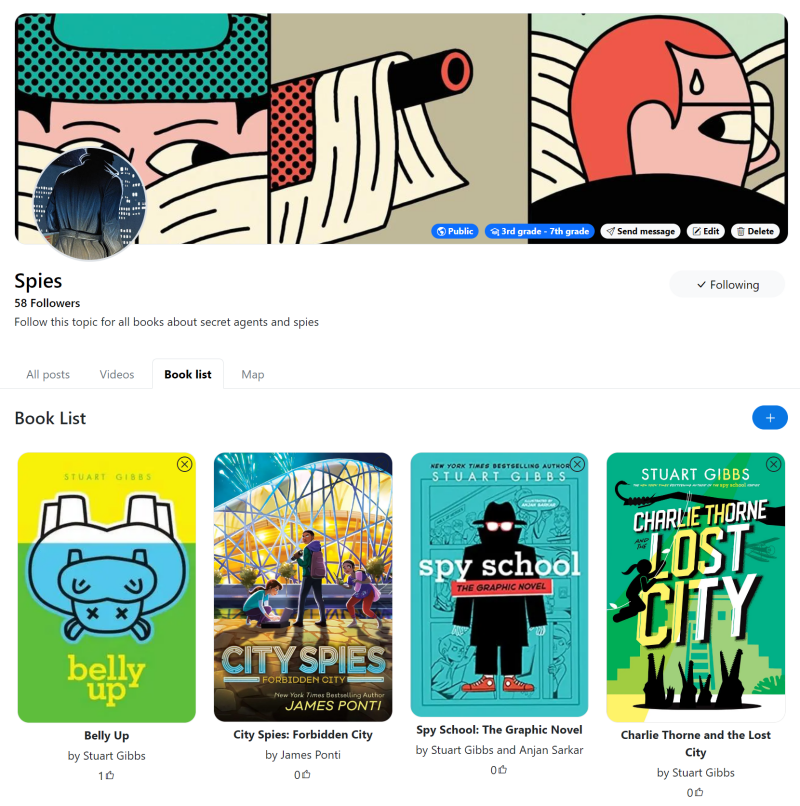
To spotlight books:
- Create a topic that can either be public (viewable by all users) or private to your school (viewable only by students and educators in your school).
- Then, add books to that topic.
- Next, schedule when the books on that topic will be spotlighted on the homepage by specifying a date range for when they should appear.
Educators can spotlight topics at the School and Class levels.
System-level topic spotlights are created and managed by Bookji. You can't edit these, but you can disable them at a school or class level if you don't want them to appear.
Only school administrators within Bookji can create school-level topic spotlights, and any educator can create class-level topic spotlights for their classes. At the class level, you can turn off any school or system-level spotlight; at the school level, you can disable any system-level spotlight.
To create a school-level spotlight, navigate to My School and click the School Topic Spotlights pod.
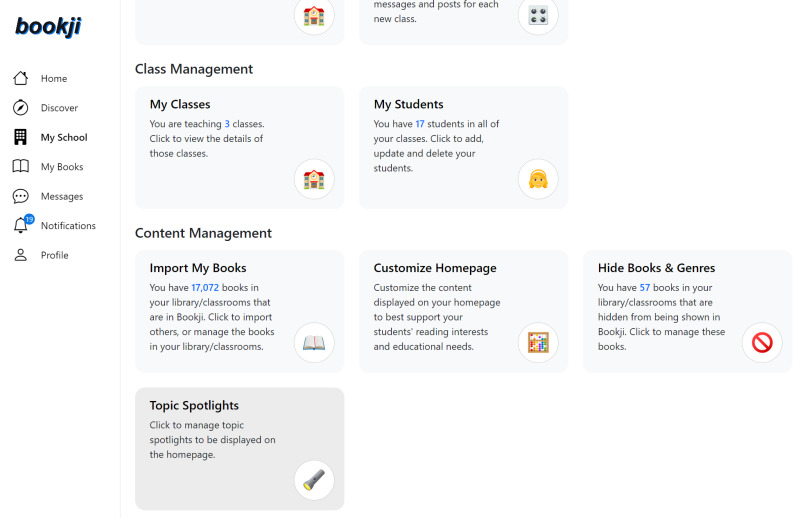
Then click on the 'Manage School Topics Spotlights' pod.
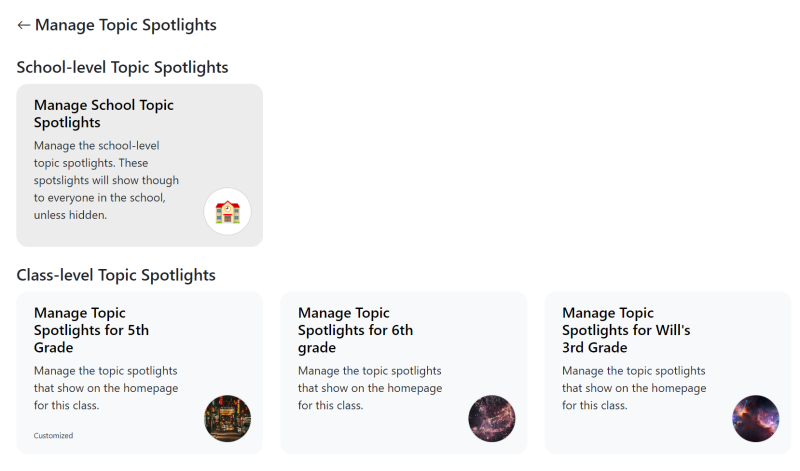
Next, you will see a listing of the system-level topic spotlights, which you can show or hide, and you can create your own spotlights by clicking the 'Add Topic Spotlight...' button at the top of the page.

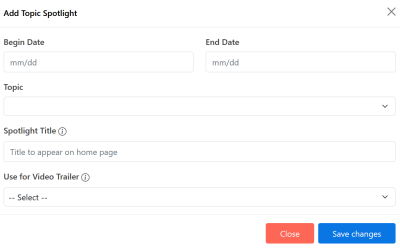
Clicking this button will invoke the following dialog, where you specify a date range (Begin date & End date) for the spotlight to show, the topic, a title to appear above the list of spotlighted books on the homepage, and whether to have the trailer video also show a spotlighted book.
To create a class-level spotlight, navigate to My School > My Classes and click the click the School Topic Spotlights pod.
Then click on the 'Manage School Topics Spotlights' pod.
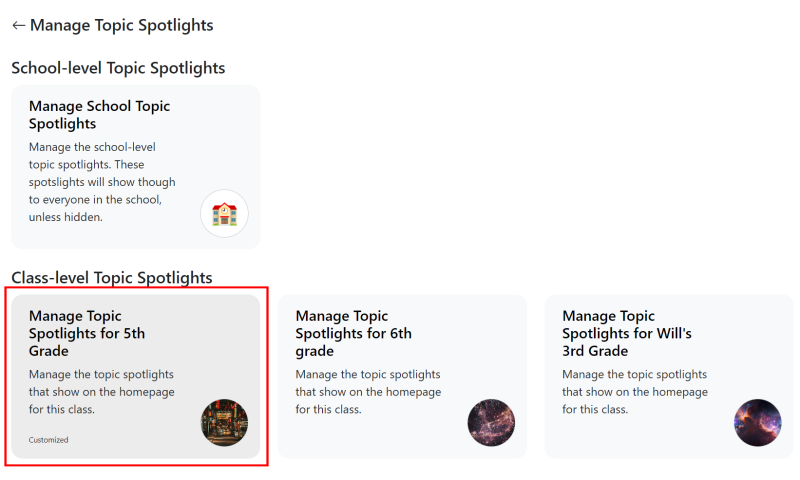
This action will open the 'Manage Class Spotlights' page, where you can turn on/off the showing of system—or school-level spotlights and create your own class-level spotlights. The interface for adding a class-level spotlight is the same as adding one at the school level.
One thing to remember about spotlights is that they are sensitive to the current user's grade level. When you define a topic, you indicate a grade-level range for that topic. So, if the topic is outside the current user's grade-level range, it will not show. This also applies to books in the topic. Only books appropriate for the current user's grade will show.
Yes. Bookji allows students to quickly and easily record and track their reading progress.
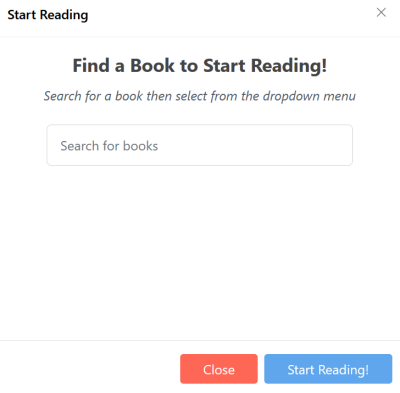
To start reading a book, the student navigates to 'My Books.' The first tab lists 'Reading Now' books. Click the 'Plus' icon in the circle to the right of the header.
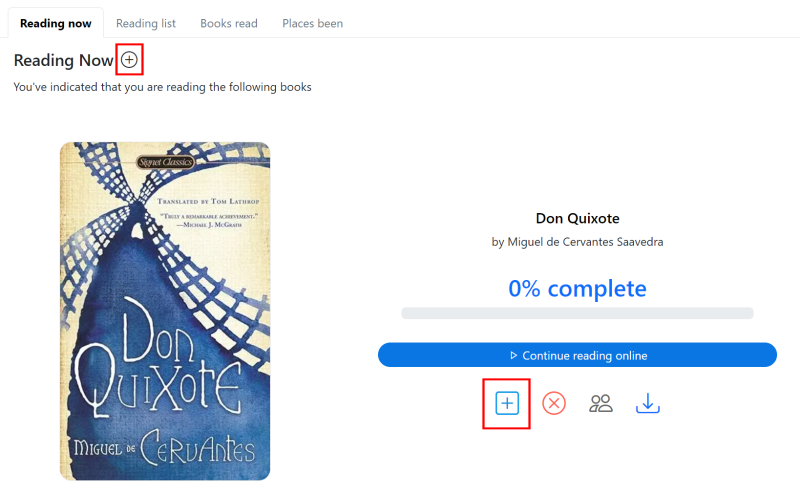
This action will open the 'Start Reading' dialog, which will step the student through a series of questions about the book.
Upon saving, the new book is listed at the top of the page, with the most recent books listed first.
As you read, click the blue plus (+) icon underneath the percentage indicator to update your progress.
This action will open the 'Add Reading Progress' dialog, which has four (4) steps, collecting the following information about what they just read:
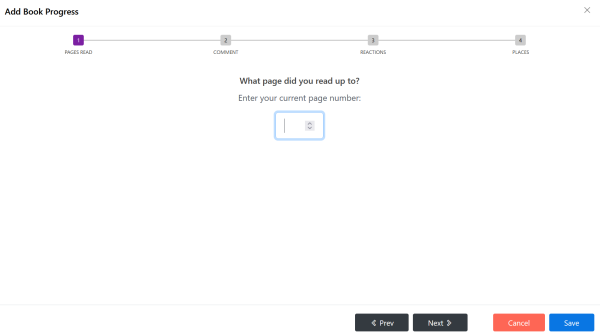
- The page they read up to.
- Comments about what they just read (Optional).
- Emoji reactions about what they just read. (Optional)
- And any geographical places they visited. (Optional)
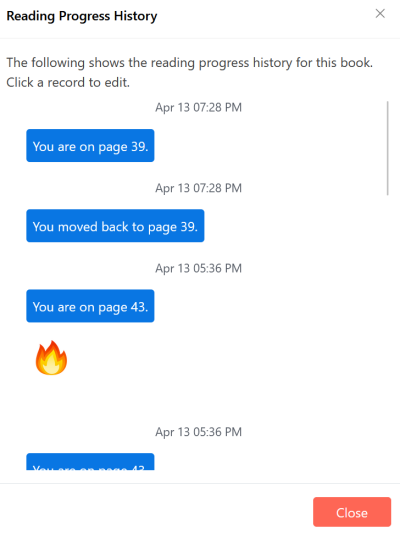
To see their reading progress, the student can click the clock-like icon.
![]()
This action will open the 'Reading Progress History' dialog, which displays a chronological history of their reading activities for this book.
With all of the above being said, if a student reads a book using Bookji's built-in eReader, Bookji automatically tracks the user's reading progress. They don't need to manually update their progress through the 'Add Reading Progress' dialog. They can also create comments, react to pages, and mark places they have been directly within the ePub reader.
Clicking the map icon will open the page showing all the geographical places they have visited in this book.
![]()
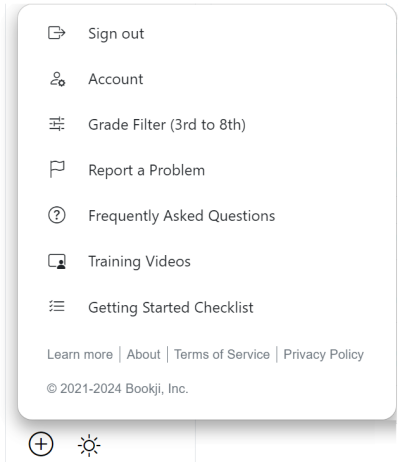
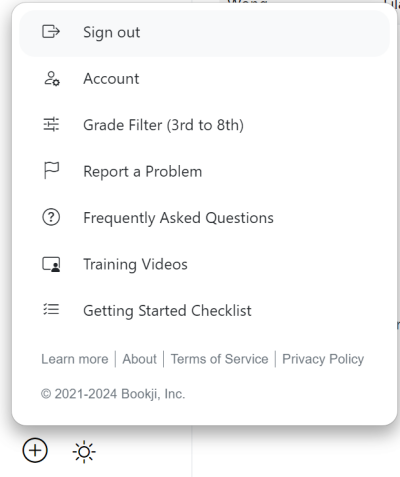
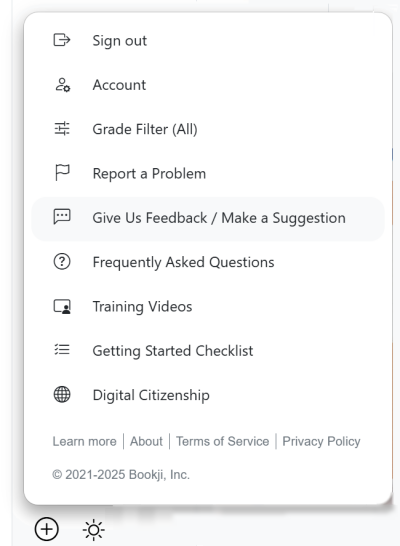
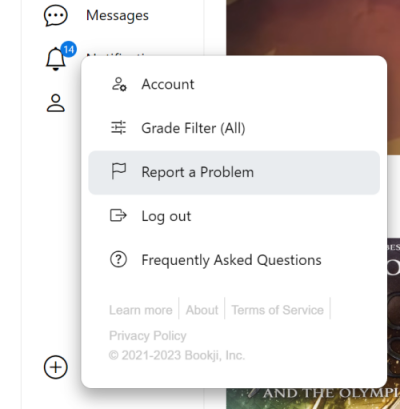
To sign out, click the 'More' menu, which is the circle with a plus sign icon in the bottom left corner of the page. Then, choose the 'Sign out' menu.
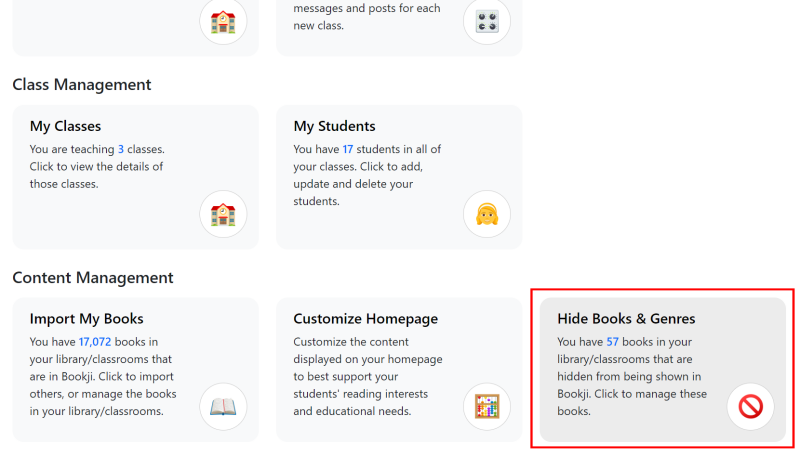
Yes, Bookji allows you to hide certain books. Navigate to the 'My School' or 'My Classes' menu and click on the 'Hidden Books' pod. From there you will see a listing of hidden books, and you can add or remove books as you see fit.
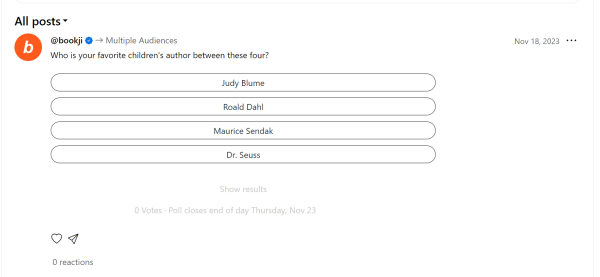
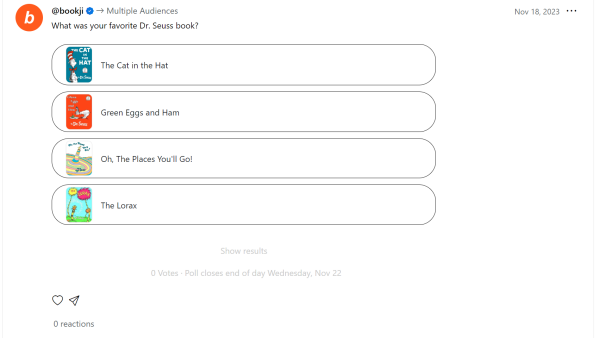
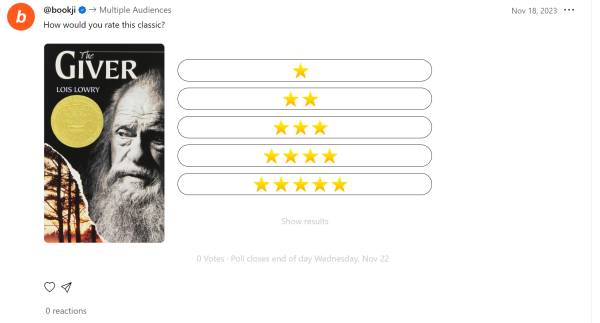
Yes, Bookji allows both educators and students to create one of four (4) types of simple polls by creating a post and adding poll answers to it. Then, when educators or students see the post, they can vote on your poll question by selecting an answer.
The four (4) types of polls you can create are:
-
Standard Poll: a poll with up to 4 text answers.
-
Book Poll: a poll with up to 4 books as answers.
-
Emoji Poll: a poll with up to 5 emoji reactions as answers.

-
Rating Poll: a poll with up to 5 possible ratings as answers.
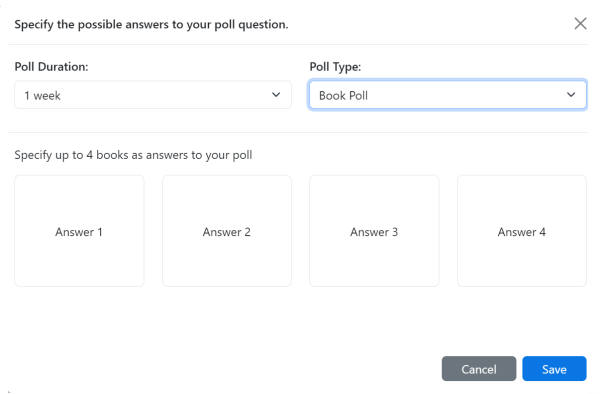
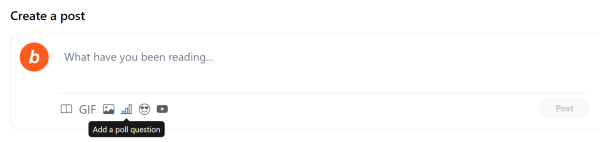
To create a poll, start by creating a post. Type your poll question into the post caption, and then click the Poll icon (the bar graph icon).
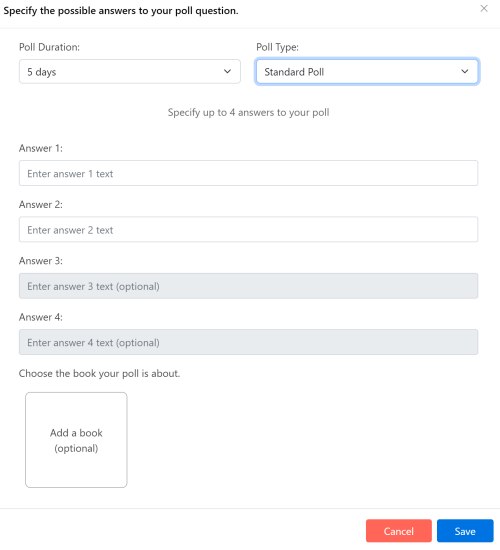
This action will invoke a dialog where you will specify:
- the poll duration;
- and the poll type

Upon selecting the poll type, you will need to specify the possible answers to your poll based on that type (e.g., for a standard poll type, you will supply 2-4 text answers). The interface for specifying the Standard Poll type is shown below.
For all poll types besides the Book poll, you can specify a book about which your poll is based. An associated book is required for rating polls. If a book is provided, it will appear to the left of the poll answers or results, as shown below.
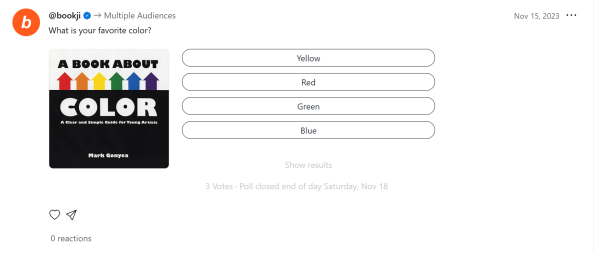
Users who see the post can vote in your poll. Each user can only vote once, and once they vote, they will see a bar chart of the results. Users can't change their vote once they vote.
No one sees who voted or how an individual voted; only the aggregate results are available.
Each poll has a duration, and once the poll's end date passes, no further votes can be cast.
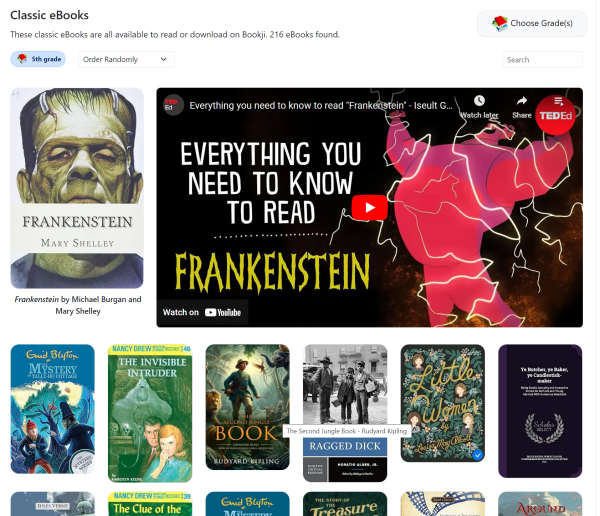
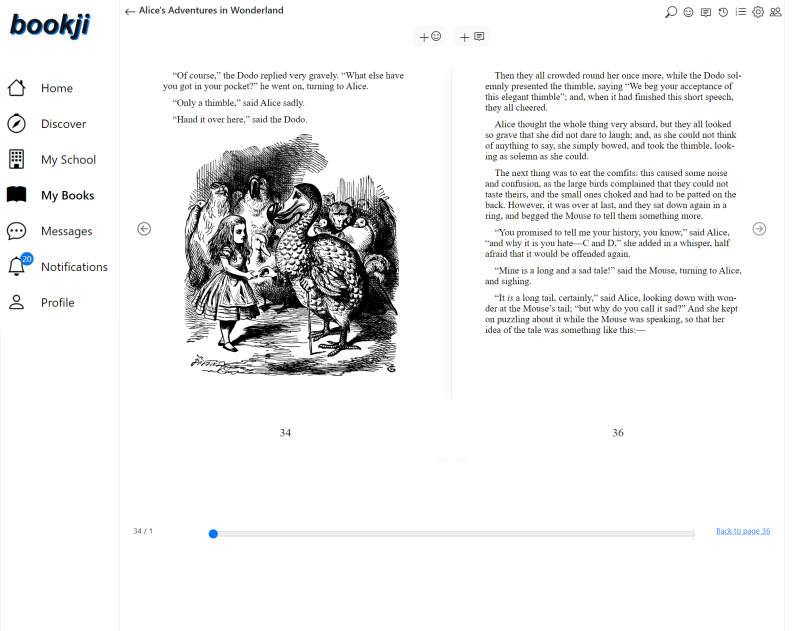
Yes, Bookji has about five hundred (500) classic, public-domain eBooks that anyone can download or read online in Bookji's eReader.
To access our collection of eBooks, navigate to Discover > Classic eBooks.
Here, you will see eBooks based on your grade level. The initial view shows the eBooks randomly with trailers intermixed. You can sort the eBooks by title or author or search for a specific book.
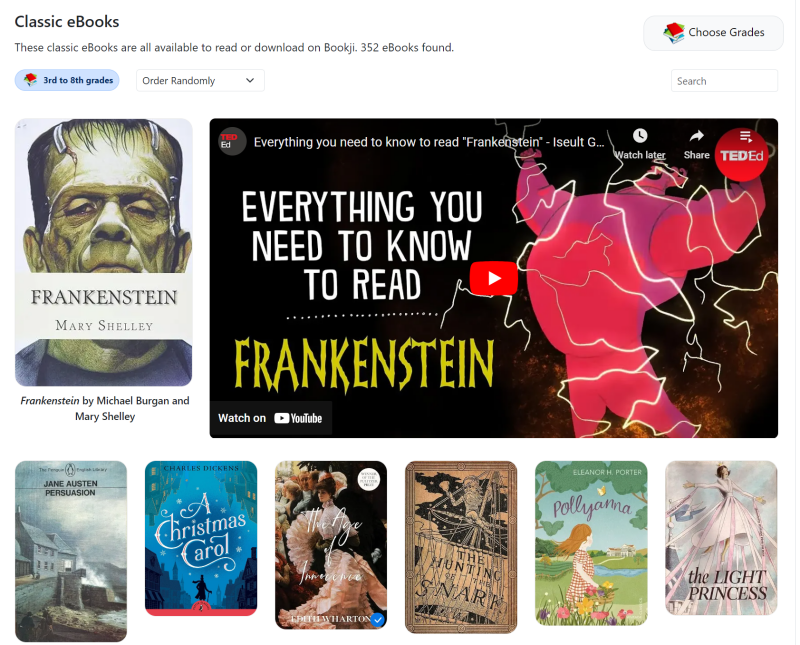
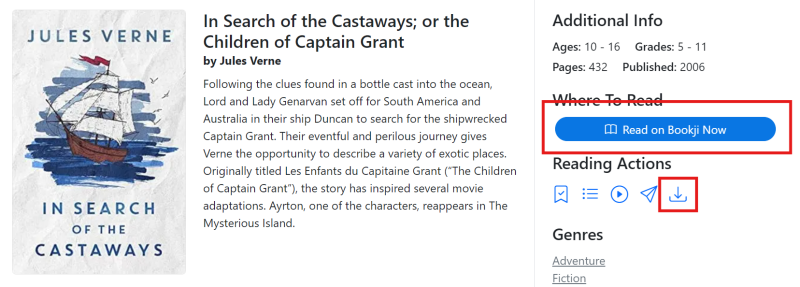
To read an eBook online or download it, click the book cover of the desired eBook.
This action will open the book's 'detail' page. In the right-hand column, click the blue 'Read on Bookji Now' button or the download icon under the "Reading Actions' section.
Yes, Bookji has a built-in eBook/ePub reader, where you can read any of Bookji's five hundred classic eBooks online.
Bookji's eReader read comes with some great features, including the following:
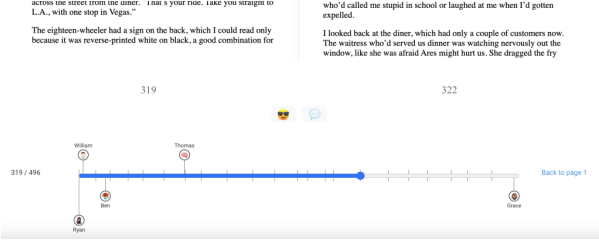
- Progress Tracking — As you read a book, Bookji will automatically track your reading progress and record it.
- Group Read — You can set up a group read, in which multiple students can read the same ePub book, share comments and reactions, and see each other progress in real-time.
-
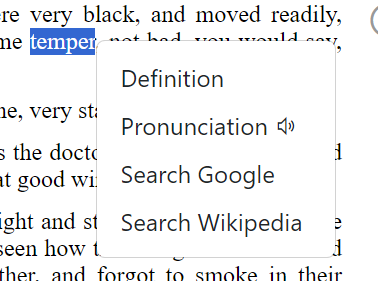
Word Definition and Pronunciation — Highlight a word in our eReader, and Bookji will give you options to see the definition or hear an audio pronunciation.
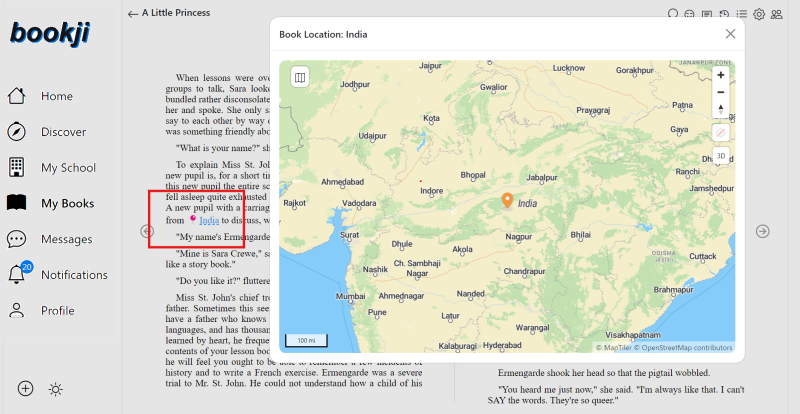
- Location Mapping — Locations within a book appear as links. Clicking them opens an interactive map showing their location.
- Emoji reactions & Comments - As you read, leave reactions and comments.
Navigate to Discover > Classic eBooks and pick an eBook to read.
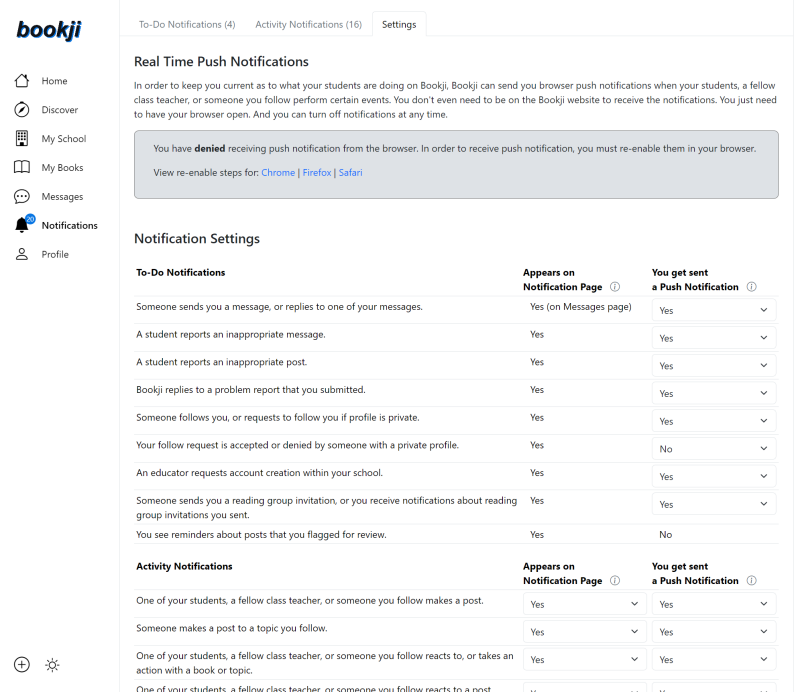
Yes, Bookji provides two levels of notifications. The first is notifications within Bookji under the Notifications menu in the left-side navigation. The second is browser push notifications, which appear as popup messages provided your browser is open but not necessarily on the Bookji site. To configure what notifications you see, click the 'Notifications' menu, then open the 'Settings' tab.
To configure what notifications you see, click the 'Notifications' menu, then open the 'Settings' tab.
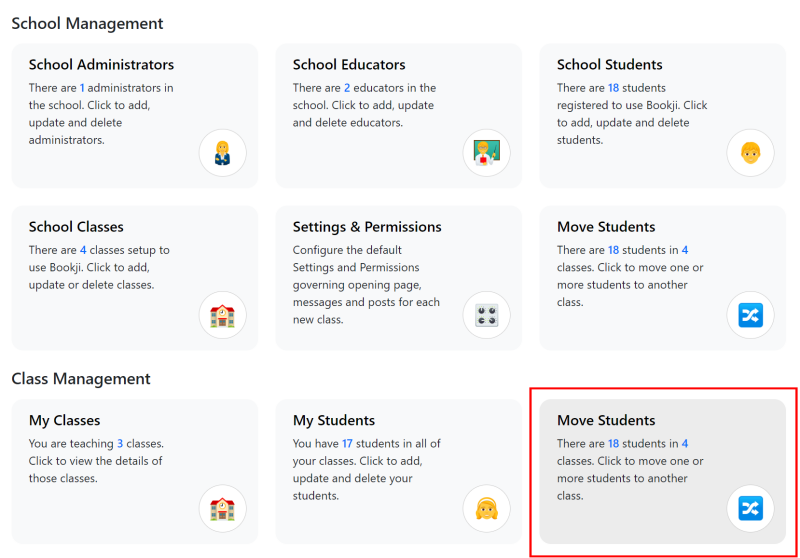
Bookji provides a 'Move Students' tool under 'My School' or 'My Classes' to move one or more students from their current class to a new class. This tool is great when starting a new year.
Navigate to 'My School' or 'My Classes' and click on the 'Move Students' pod.
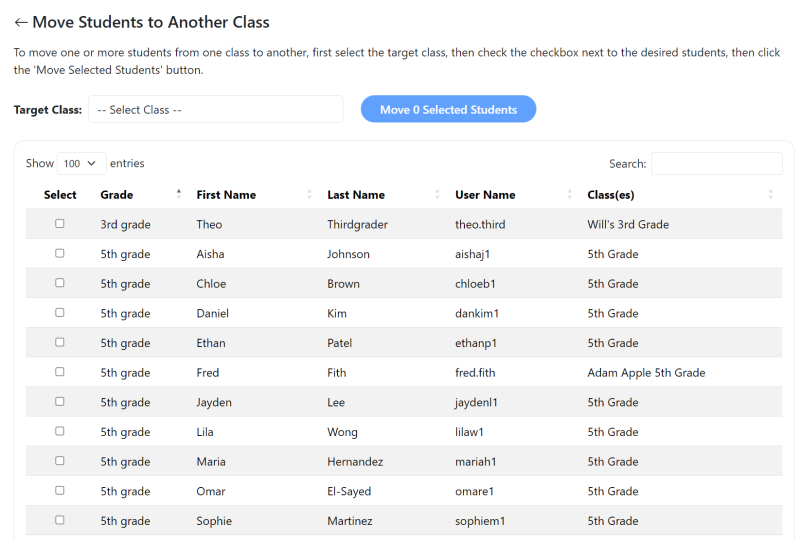
This action will open the 'Move Students to Another Class' page, where you can multiply select one or more students and then move them to a specified class.
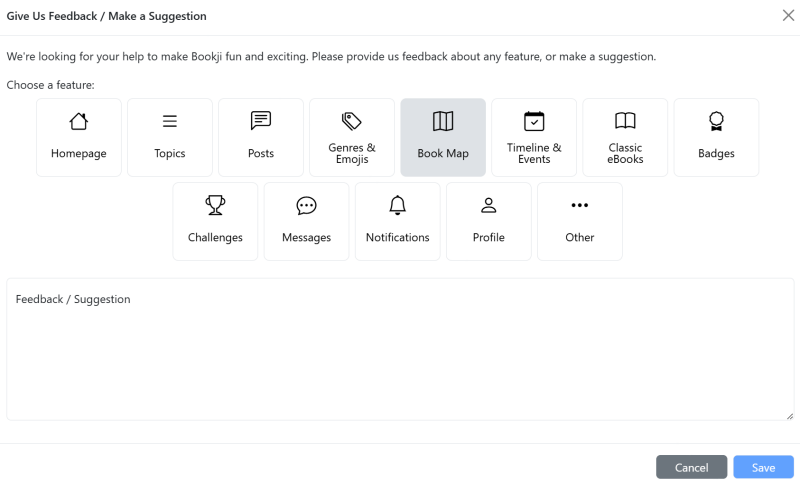
Absolutely. We greatly value your feedback and suggestions and encorage you or your students to share any thoughts you may have.
Simply choose the 'Give us Feedback / Make a Suggestion' menu from the More menu.
Then, in the resulting modal, select the feature your feedback applies to, and provide your thoughts in the textarea below.
Hopefully, you won't run into any bugs, but if you do, please use the built-in 'Report a Problem' feature. Click the plus icon (+) and choose the 'Report a Problem' menu option.
A dialog listing categories of issues will be displayed. Select the most appropriate one and give a detailed description of the problem you are seeing.
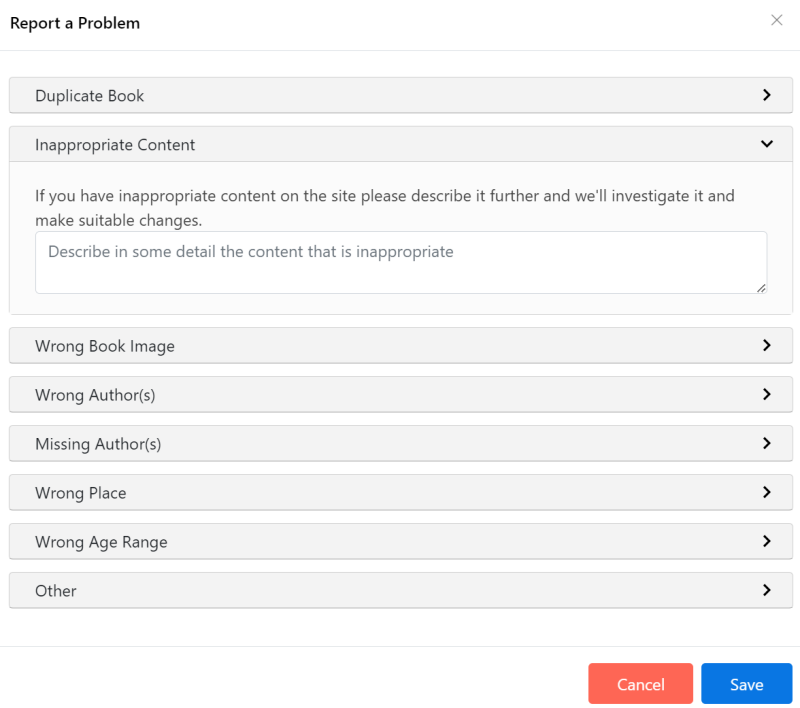
Upon submission, the Bookji team will be notified. We will fix the problem as quickly as possible.
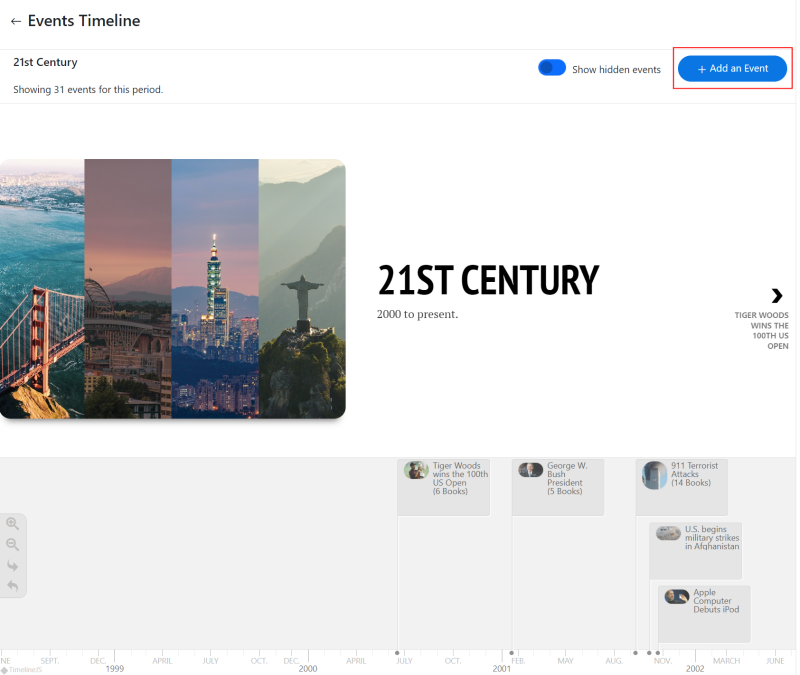
Yes, Bookji allows you, as an educator, to add or edit events on the timeline. Navigate to 'Discover > Timeline' and click on the event icon for the period. A blue 'Add an Event' button will be in the upper right-hand corner. Clicking that will navigate you to the 'Edit Event' where you can add an event.
Remember, any event you add will be viewable by all users.
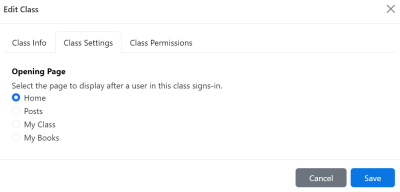
At an individual class level, teachers can set the 'opening page' their students see after signing in.
By default, each class's setting defaults to opening the Homepage, but the class teacher can change the class's setting so it opens the My Class page or another page.
To change the class's setting as the teacher, navigate to My Classes > My Classes. Choose your class and click on the pencil icon.
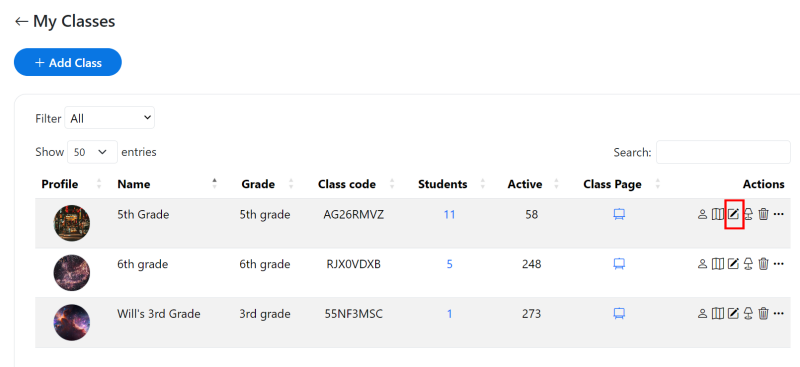
This action will open the Edit Class dialog. Click on the Class Settings tab. Here, choose the page you want as the opening page.